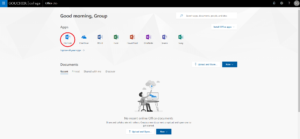
Horizon MyApps

What is Horizon MyApps?

Horizon MyApps is a site that allows Goucher users to run specialty software from their own computer through the Horizon Client application. The specialty software is actually running on a Goucher server although it appears to be running from your own computer.

Examples of student software:

  • SPSS
  • MATLAB
  • Office 2016 (Including Word, Excel, Powerpoint, etc.)

Examples of faculty/staff software (dependent on department):

  • Image Now
  • PowerFAIDS
  • PowerCampus
  • Raiser’s Edge

NOTE: If you are on a Mac, there are some programs you can only access through Horizon (examples include PowerCampus and Raisers Edge).

How do I install Horizon MyApps?

Before you begin…

  • On-campus users must be connected to GoucherWifi or ethernet (not GoucherGuest)
  • Off-campus users must make a VPN connection to the Goucher network.

From your PC or Mac:

    1. Open a browser on your computer and go to https://myapps.goucher.edu.
    2. Download and install the “VMWare Horizon Client” on your computer.
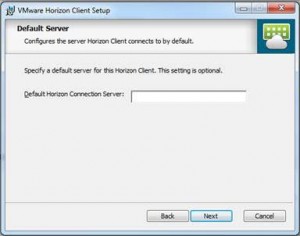
    3. After downloading and installing the Horizon client, you are presented with the above screen  Enter myapps.goucher.edu as the connection server, then click next.
    4. Log in with your Goucher username and password.

You only have to configure the Horizon Client Server on your computer once. The next time you launch this software, just double-click the MyApps.goucher.edu icon and enter your Goucher username and password to continue.

Saving and Accessing your Files

Students

For students doing work on the Horizon programs, you will need to access and save your work files through Darwin. The following linked article details the entire process:

Darwin and Horizon (Students)

You can also save documents to your local computer, in VMware Horizon Menu -> Settings -> Drive Sharing on Mac, or Settings -> Drive Sharing on PC.

By allowing VMware Horizon access to C:\Users\username or to the Library username, you can save documents to your personal device, which can be later uploaded to OneDrive or Canvas.

When you go to save your data, you’ll see the option to save to user \\TSCLIENT, where user is the username from the computer you are signing into VMware Horizon from.

Faculty/Staff

When working on Horizon, Faculty/Staff must save their files to the hard drive on their own computers. During the initial Horizon setup process, you may have been prompted to allow access to local and removable storage. If you selected it then, you can skip this section. Otherwise, below are instructions on how to set that up:

For Mac Users:

  1. Click VMware Horizon Client menu
  2. Select System Settings or Preferences depending on your macOS version
  3. Click the Drive Sharing tab
  4. Check the box to allow access to username
  5. Restart VMware Horizon once completed.

For PC Users: 

  1. Click on the Settings menu in the top right corner of the window
  2. Select Drive Sharing
  3. Click the toggle to ‘On’ for “Share your local files”
  4. Click Apply, then restart VMware Horizon

Is there anything I can do if I have technical problems?

If your computer freezes or you have other problems, try the following:

  1. From the VMWare Horizon Client window (not inside one of the software programs), click the gear icon in the upper right and select RESET.
  2. Uninstall the VMWare Horizon Client and reinstall it.
  3. For Sharing issues:
    • On Mac: Go to System Preferences. Under “Sharing” select “allow access to [username].”
    • On PC: Go to the gear in the top right corner of the window. Under “Sharing” select “allow access to [username].”

If neither of these steps corrects your problem, contact the IT Help Desk at helpdesk@goucher.edu for further assistance.

Darwin and Horizon (for Students)

For Goucher students that are doing work on programs accessed through Horizon (SPSS, MatLab, etc.), your work files will need to be stored and accessed on your user folder on Darwin (the network storage drive for students). Below are instructions for how to use Darwin and Horizon based on your computer’s operating system:

NOTE: These instructions were made for when you are on campus. If you are accessing from off-campus, you will need to be connected to your own wireless network and then connect to Goucher’s AnyConnect VPN.

Darwin Instructions (Mac)

Darwin Instructions (Windows)

Report a Classroom Emergency (Faculty)

When should faculty call the classroom emergency line vs. the Help Desk?

Call or email the Help Desk when you need to:

  • Schedule for assistance for your class ahead of time
  • Review the equipment in a new room
  • Report a problem that occurred after hours or didn’t disrupt the class

Call the Classroom Emergency line when your class is already in session and the AV system isn’t working. There may be a delay if you call the Help Desk number. When you do need emergency assistance, call 410-337-3290 and leave a message with the following information:

Name

Room

Description of problem

Call back number

We highly recommend saving this number as a contact in your cell phone. Classroom emergency support is available Monday through Thursday, 7:30am to 8pm and Friday, 7:30am to 7pm during fall and spring semesters.

Common Printing Problems with Macs (Faculty/Staff)

There are two main errors that occur when sending print jobs on a Mac on campus:

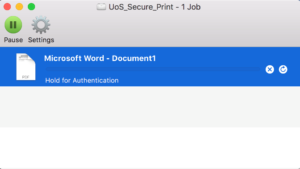
  • You get a “Hold for Authentication” error
  • The printer pauses itself (even after you trying resuming it multiple times)

Hold for Authentication

This error (shown above) occurs when the password your computer has saved doesn’t match what your current Goucher password is in the system. This usually happens after changing your Goucher account password. This is how to fix it:

  • Open the printer queue window. If you just tried to send the print job, it is likely showing a printer icon on your Dock with a warning symbol on it, which will take you to the queue window.
    • If you do not see a printer icon on the Dock, You can also click on the magnifying glass in the top right corner and search for “Printers & Scanners”. The Printers window will appear; double-click the printer on the left-side panel that is throwing the error.
  • Next to the print job that’s being held, there are two buttons. One has an X on it, and the other is a circular arrow. Click the circular arrow button.
  • A window will pop up asking for your credentials. Make sure your username is in the username field, and re-type in your new Goucher password in the password field.
    • Remember to click the check box to save it to your keychain.
  • Click OK.

The print job should now properly send. You may have to repeat this for all of the remaining jobs that are being held (or you can cancel them and re-print).

Printer Repeatedly Pausing (Even After Resuming)

This primarily occurs because your computer is connected to GoucherGuest and not GoucherWIFI. Click on the WiFi icon in the top right corner on your screen, and switch your computer to GoucherWIFI.
If the computer still keeps connecting to GoucherGuest, you may need to remove GoucherGuest from your saved networks list. This article details the steps on how to do that: How to remove a saved WiFi network in Mac OS X

If neither of those two fixes resolve the issue, please contact the Help Desk.

Adding your Office 365 email account to your mobile device

This page provides instructions on how to set up your Office 365 email account on your mobile device, whether it be a tablet or smartphone running Android or iOS.  The settings and instructions have been tested to the fullest extent possible. From feedback and support postings on the vendor/manufacturer’s websites we recognize that these settings may not function properly under all circumstances.

Not sure if you have an Office 365 email account or not?
If your email address ends in ‘@goucher.edu’ (Ex: John.Doe@goucher.edu), you most likely have your email account on Office 365.
If you have an @mail.goucher.edu email account, follow this article instead: Adding your mail.goucher.edu email account to a mobile device

Microsoft Outlook Mobile App


For both iOS and Android, there is a Microsoft Outlook app in both App Stores that we highly recommend using to set up your email on your mobile device. The setup process is very easy, and the app automatically integrates your calendar and email all into one application, as well as allow you to add other email accounts if you wish.

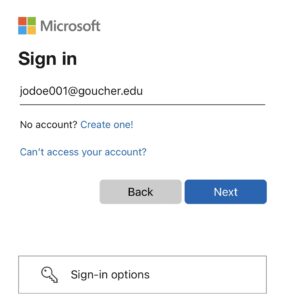
Step 1: Download the Microsoft Outlook App from your App Store and run it. It will prompt you to log in. The format to type in is as follows:

(your username)@goucher.edu (Ex: jodoe001@goucher.edu)

Step 2: On the next screen, type in your Goucher account password.

Step 3: After login is completed, it will ask if you want to add another account; you can either choose to or skip and go straight to your inbox.

     iOS Mail App

For Android, we do not recommend anything other than the Outlook app because of how different phone manufacturers set up their mail applications.
For iOS we still highly recommend the Outlook app, but the stock Mail app is still an option if you wish to set it up there. Here is the process for setting up your Goucher email account (as of iOS 11):

Step 1: Open the Settings app, and scroll down until you see “Accounts and Passwords”. Choose that, and click the “Add Account” button. The mailbox type is “Exchange”.

Step 2: In the email field, type your full email address (Firstname.Lastname@goucher.edu). The description field can be set to whatever you want (“Goucher”, for instance). Click “Next” in the top corner.

Step 3: In the email field, type your full email address. The description field can be set to whatever you want (“Goucher”, for instance). Click “Next” in the top corner.

Step 4: A pop-up will come up asking if you want to “Configure Manually” or “Sign In”. Choose “Sign In”.

Step 5: Sign into your Microsoft account with your Microsoft ID (jodoe001@goucher.edu) and password.

Step 7: The final screen will ask what items you want to import with  your account. Mail is required, but you can also choose the other items if you wish. Click “Save” to confirm the account is added.

Step 8: Open your Mail app, and your Goucher email account should now appear. Note: You may need to press and swipe from the top down to refresh the view.

Adding your mail.goucher.edu email account to a mobile device

Undergraduate students that enrolled prior to Fall 2018 have their email accounts on mail.goucher.edu. As mail.goucher.edu is on Gmail, we recommend using the Gmail app to add your email account to your mobile devices (phone/tablet). These instructions apply to both iOS and Android.

If you do not already have the Gmail app installed:

Open the App Store for your device, download the Gmail app, and open the app. There will be a Sign In button that takes you to the Gmail login page.

If you already have the Gmail app installed:

Follow Gmail’s instructions for adding another account, located here. You will choose “Google” as the type of account.

Signing In

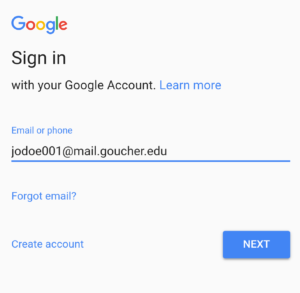
You will eventually be taken to a sign-on page for Gmail. The address you type in for your account is: (your Goucher username)@mail.goucher.edu (see below screenshot):

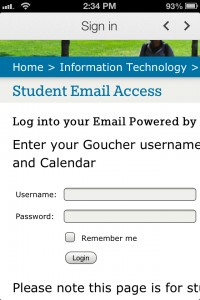
You will be re-directed to the Goucher Student E-mail Log-in. Type in your Goucher username and password. Remember to check the Remember Me box so you do not have to login again.

If everything is set up correctly, you should be taken back to the Gmail app and your account will be added.

How to forward Goucher email

Directions for forwarding email are based on what kind of email account you have. The following links are from Microsoft and Google’s support sites, respectively:

If your email address ends in ‘@goucher.edu’:
How to forward emails in Office 365

If your email address ends in ‘@mail.goucher.edu’:
How to forward emails in Gmail

I received an email in my inbox I believe to be spam/phishing. What do I do?

Even with a spam server in place, there may be a small amount of spam and/or phishing messages that will still get through to your inbox.  By using the steps below, you can help us block these emails from coming through in the future. *Note: These steps do not work on mobile devices such as phones or tablet apps.

How to Report Spam/Phish Email

IT recently enabled a protection feature within Outlook that allows you to report spam/phishing emails. These quick and easy steps will help Microsoft identify which emails are spam/phishing and will eventually prevent them from coming through again.

  1. Select the email in your inbox that you believe to be spam/phishing.
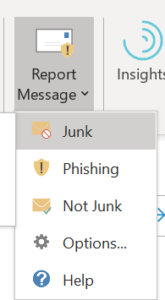
  2. On the Home tab, click Report Message and then select Junk if it’s spam or Phishing if it’s an email that is trying to collect private information.

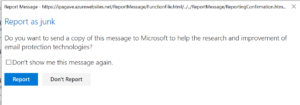
  3. Then select Report when prompted.

The spam email will be moved to the Junk Email folder and reported to Microsoft. The Phishing email will be reported to Microsoft then you can delete it.

Keep in Mind…

  • You may still continue to get the same email until Microsoft is able to completely block the sender.
  • You can also report email as safe if you find that it’s being caught by quarantine.
  • If you still experience a problem, please contact the Help Desk for further assistance.