Included with your Office 365 account, OneDrive is an unlimited cloud drive similar to Box, Drop Box, and Google Drive. Using OneDrive to store computer files saves hard drive space, and makes sharing files and folders with other Goucher faculty, staff, and students easy. When you create or edit a document saved to OneDrive, from any location or any device, changes will automatically save back to your OneDrive account.
Learn More
- General Information from Microsoft
- More About Finding Files Shared With You
- Using Favorites to Find Frequently Used Files
General Information from Microsoft
Below are links to articles written by Microsoft support to help you get started using OneDrive. Please contact the IT Help Desk if you have any questions or need assistance with the install or an update.
| resource | description |
|---|---|
| OneDrive Quick Start Guide | A visual map of the OneDrive screen on browsers and the mobile app. |
| OneDrive Video Training Series | Short video tutorials on OneDrive features. Note – Goucher accounts are OneDrive for Business Accounts. |
| OneDrive Help and Learning Dashboard | Includes the links below and many more. |
| Installing OneDrive for Windows/Mac/Mobile | If you have Windows 10 or above, OneDrive is already installed on your PC. Use this link if you’re using a Mac, another version of Windows, or want to use the OneDrive mobile app, |
| Uploading and saving files and folders to OneDrive | Step-by-step guide on saving files/folders to OneDrive |
| Syncing files and folders between the web (cloud) version and your computer | Step-by-step guide on syncing files between OneDrive and your computer |
| Sharing OneDrive files and folders | Step-by-step guide on sharing OneDrive files/folders |
| Viewing Shared Folders (and Adding to My Files for quicker access) | When someone shares a folder with you, it appears in the Shared section of your OneDrive account on the web. If you have Edit permissions to those shared folders, you can add them to the My files section of your OneDrive to make them easier to access and work with. |
| Creating a File Request | This is a useful feature! With the file request feature in OneDrive, you can choose a folder where others can upload files using a link that you send them. People you request files from can only upload files; they can’t see the content of the folder, edit, delete, or download files, or even see who else has uploaded files. |
More About Finding Folders Shared With You
Note that files/folders shared with you will always be available to you on the web from the Shared space, but only items in the My Files space will automatically appear in File Explorer or Finder on your computer. To add shared items to My Files, follow the steps below.
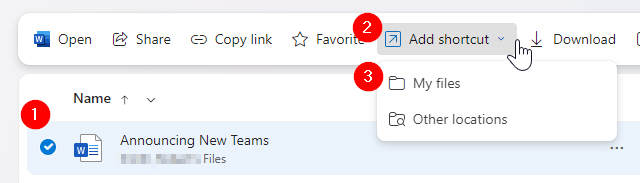
- Open your OneDrive account online.
- Navigate to Shared.

- Select one or more items, click “Add shortcut” on the toolbar and select “My Files”.
Alternatively, you can also right-click on an item and select “Add Shortcut“.
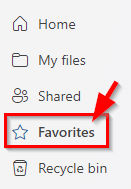
Using Favorites to Find Frequently Used Files
Another tip for organizing your OneDrive content is to Favorite items you work with often.
- Open your OneDrive account online.
- Navigate to My Files or to Shared.
- Select one or more items and click “Favorite” on the toolbar. Alternatively, you can right-click on an item and select “Favorite“.
- Navigate to “Favorites” on the OneDrive navigation panel to find these items in the future. You can also declutter this file list as needed by selecting a file or files from this area and choosing “Unfavorite” from the toolbar.