Canvas: New Features

New Feature Highlights (May 2024)

New Quizzes: Build Upon Prior Attempt

The Build on last attempt setting makes it possible for students to take additional attempts on a quiz, only re-attempting those questions they answered incorrectly. This feature can help to improve student outcomes and performance.

A video of this feature can be found here. For more details, see this guide.


New Quizzes: Zero Point Quizzes

(This is the strategy for surveys.) Instructors can now create zero point quizzes in Canvas and select an option to not display a column in the gradebook or student’s grades view. This allows instructors to remove unwanted content in the gradebook and prevent confusion for students related to zero-point practice quizzes. For more details, see this guide.


Publish Modules in Bulk

Instructors can now publish or unpublish modules in bulk.  Instructors have the option to publish all modules and items, publish all modules only, or unpublish all modules and items. Additionally, the publish icon on individual modules is updated to include a Module status menu. This menu includes the options to publish module and all items, publish module only or unpublish module and all items for individual modules.


Scheduled Page Publication

Teachers can schedule publication for an unpublished page. Teachers can use the Publish At box in any unpublished page in their courses. Click here to read full release notes for Saturday, October, 15, 2022.


Submit on Behalf of Students

Teachers and TAs with the ability to edit grades can find a Submit for Student link by opening the Gradebook, clicking a cell, and clicking the grade detail tray icon to open details for the submission represented by the cell. When someone submits files on behalf of students, Canvas displays the name of that person and the time they submitted it. Read more in the March 18, 2023 Canvas release notes.


Discovering New Features

Did you know you can find new feature announcements in the Canvas Help menu?

Help-NewFeatures.png

Canvas New Discussions/Announcements on July 20, 2024

Canvas is rolling out a new design for Discussions and Announcements on July 20th, 2024.

All existing Discussions and Announcements will be updated to the new design on this date. No current discussion options will be discontinued, but Discussions will have an updated user interface and new features. This update will also have an impact on the Announcements interface. The new design is already available for Teachers to turn on in their courses earlier than July 20th if desired (see below for more details).

Included in this notice:

  • What’s New
    • Interface Modifications
    • New Features
  • Learn More
  • Switching to New Discussions/Announcements Early

WHAT’S NEW

Interface Modifications

For individual discussion and announcement topics, the following modifications have been made:

  • The toolbar appears at the top of the discussion and announcement thread.
  • Newest replies display at the top of the first page instead of the bottom of the last page.
  • Users can sort replies from newest to oldest, or oldest to newest.
  • Users can also quickly move to the top of the discussion or announcement at any time.
[Screenshot of current discussion thread compared to new discussion thread]

Current/Previous Discussion Screenshot

New Features

  • Anonymous discussions.*
  • Labels for posts created by the “Author” or  “Teacher” for easy identification. Posts from TAs will also be labeled as “Teacher”.
  • A streamlined view of multiple replies to the same post that can be displayed either “inline” (click to expand) or in a “split view” (in a side panel).
  • Supports mentions with the @ symbol. Typing “@” will bring up a list of all users in the course.
  • Quote other replies when responding.
  • Allow participants to report replies that are inappropriate or offensive.*

This feature is off by default and must be enabled to use.

LEARN MORE

SWITCHING TO NEW DISCUSSIONS/ANNOUNCEMENTS EARLY

Teachers who wish to switch to the new Discussions and Announcements interface prior to the July 20th mandatory update can do so from their Course Settings. Enabling this new feature will update all Discussions and Announcements in the course. Teachers can switch back to the classic design again up until the July 20th deadline.

  1. From the Course page, go to Settings > Feature Options [tab]
  2. Find “Discussions/Announcement Redesign” and click the X icon next to it on the right.
  3. Click “Enabled” to initiate the update.

To go back to the classic design, follow these steps again and choose “Disabled” in step 3. You will not be able to choose the classic design after July 20th.

Canvas New Quizzes

Canvas has developed a new quizzing engine called “New Quizzes” that will eventually replace the “Classic Quizzes” we use in Canvas now. New Quizzes was first introduced several years ago and although it is still being improved and expanded, it is no longer considered to be in a beta development stage. New Quizzes also have several advantages and unique features over Classic Quizzes. For these reasons, New Quizzes is currently an optional tool. Goucher instructors who wish to use New quizzes may do so while Classic Quizzes will remain available for those who are not ready to make this transition yet.

You will see the following prompt whenever you add a new quiz to your Canvas course. If you don’t want to see this prompt each time, check the box next to “Remember my choice for this course” before you hit the SUBMIT button.

Screenshot of Choose a Quiz Engine pop up

Benefits

What are some of the benefits of New Quizzes?

  • Student Quiz Accommodations for the whole course (not just quiz by quiz!)
  • Stimulus, Ordering, and Hot Spot Question Types
  • Shuffle Answers by Question
  • Printing Quizzes
  • Require Waiting Period Between Attempts
  • And more!

Ways to Explore

Canvas has a host of online resources available both for those who need more information and for those who are ready to take the plunge sooner rather than later.

Information Gathering and Planning

Step-by-Step Instructions


Questions about how to use New Quizzes not answered in the resources above can be addressed to the Canvas 24/7 Support Hotline available on the Canvas Help menu.

Using Microsoft Teams As A Student

Teams is a Microsoft communication tool used at Goucher for virtual class meetings or other video conferencing sessions. Teams is included in your Goucher Office 365 account, so it is available to every student to use for free while they are taking classes.


Installing the Teams Software

Microsoft Teams is included with Goucher Office 365 accounts and can be installed on PCs, Macs, and mobile devices, or used directly in a web browser.

    • The Teams software or app* – Download Teams for work or school on your PC or Mac desktop, iOS, or Android.
      *Recommended for the best experience

      For Windows Desktop downloads choose “Teams for work or school”. 


    • Or A Web Browser – Go to https://teams.microsoft.com.
      The browser client can also be used although it does have limitations when compared to using the installed client software or app above. Chrome or Edge are considered the best browsers for Teams Meetings. Make sure your browser has been updated to the latest version. For more information about supported browsers see Web clients for Microsoft Teams.


Logging into Teams

Log into your Goucher Teams account using the same format used to log into your email and other Office 365 software – username@goucher.edu (NOT firstname.lastname) and your Goucher password. You can double-check that you are logged in by clicking the profile picture in the top right corner.

Note for Windows Users: If you already have a TEAMS account with another organization, you can select “add account” on the log in screen to add your Goucher account. Click here to see more information on managing multiple accounts in Teams. This feature is only available to users who have upgraded to “New Teams” and will be available to Mac users soon.


Pre-meeting Check: Confirm Your Settings and Make a Test Call

Confirm or change your default mic, speaker, or camera

To select the mic, speaker, and camera you want Teams to use for calls and meetings, select Settings and more  Select to see more options  next to your profile picture at the top of Teams and then choose Settings Devices.

Under Audio devices, pick the speaker and mic you want Teams to use by default.

Under Camera, select the camera you want Teams to use, and see a preview of that camera’s video.

Make a test call

To make a test call, select Settings and more  Select to see more options  next to your profile picture at the top of Teams and then choose Settings Devices.

Choose Make a test call under Audio devices.

In a test call, you’ll see how your mic, speaker, and camera are working. Follow the instructions from Test Call Bot and record a short message. The message will play back for you. After that, you’ll get a summary of the test call, and you can go to your device settings to make changes.

Notes: 

    • The test call feature is only available in English for now. Additional languages are coming soon.
    • Test recordings are deleted immediately after the call. They are not retained or used by Microsoft.
    • The test call feature is currently only available in Teams desktop app for Windows and Mac.


Joining a Teams Meeting

The most common way to join a meeting is by clicking on a link shared with you in Canvas or through an email.

  1. Click the link shared with you in Canvas or in an email message.
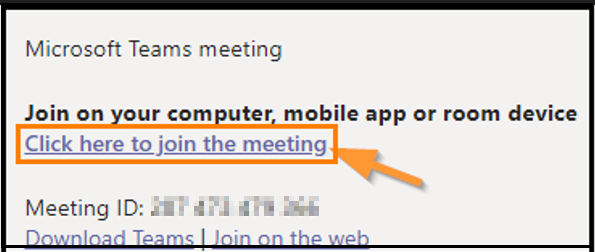
    Picture of Join Link from Email

    Example of Join Link from Email  Example of Join Link from CanvasExample of Join Link from Canvas

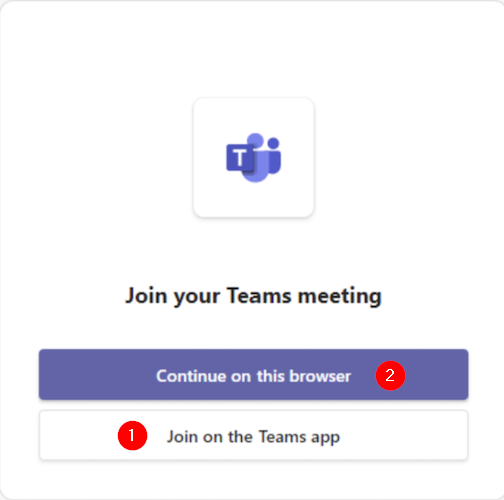
  2. A new window will appear asking if you want to join the meeting from the Teams app (1) or from your browser (2). Click one of these options to continue.
  3. If you join from the Teams app, you’ll start with a screen where you can check your camera and audio settings. Hit JOIN NOW to continue into the meeting space. If you join from your browser, you may be prompted to allow the browser to access your camera and mic before proceeding into the meeting.
  4. Depending on how the host configured your meeting, you may be taken to a lobby to wait to be admitted or you may join the meeting immediately.


Participating in a Teams Meeting

When a Teams Meeting is in progress, the Meeting Controls toolbar becomes available to all participants at the top of the screen. Microsoft has online guides for how to use this toolbar, including how to Share Your Screen, Mute/UnMute, Raise Your Hand, and lots more (see the left sidebar from any of these pages for more participation tips).


Adjusting Your View in a Meeting

Teams tries to anticipate what you’ll want to see in a meeting. If someone starts speaking, their video or profile image is shown more prominently. If someone shares their screen, that content will take main stage. But if you’d rather see something else, there are a few ways to tell Teams.

  • Switch between people and content– If someone’s presenting a PowerPoint or other content, switch between viewing their content and the people in the room by clicking the video or content you want to see.
  • Pin a video– Right-click a video within the meeting and select Pin. The video will be shown regardless of who’s currently speaking. You can pin multiple videos or right-click any pinned video and select Unpin at any time.
  • Reframe a video– Teams may crop your video to better fit the screen. If you want to change this, right-click the video and select Fit to frame to view the entire video. To see a closer, cropped view, right-click the video and select Fill frame.


Changing Display Name or Adding Pronouns

Users can choose to go by a chosen name rather than their legal name for work or study at Goucher. Please see our post Display Names and Pronouns for more information.

Note that pronouns are not added to the display name in Teams. Instead, pronouns are added to the user’s profile. Click a profile picture to open a user’s profile page and look under their name for any pronouns intentionally added by that user.


Troubleshooting Tips

Here are some self-help tips to resolving most technical issues with Microsoft Teams.

  • For best results, use the Teams app rather than the web version.
  • If you have to use the web version, switch to using Chrome or Edge if necessary and ensure your browser is updated to the latest version.
  • Make sure you are signed into your Goucher Teams account. Signing out of Teams and back in again is also a common fix to many problems. To sign out, select your Profile icon and choose SIGN OUT. Sign back in with your Goucher username@goucher.edu and password.
  • If you are experiencing low internet connectivity issues, try closing other apps that also use your internet bandwidth. You can also reduce the amount of bandwidth needed by turning off your own camera or the video feed from others (click on VIEW on the toolbar, select MORE OPTIONS, and then click TURN OFF INCOMING VIDEO).


Display Names and Pronouns

Display Name

By default, many of our systems are automatically populated with your legal name. If you wish to be addressed by a chosen name instead of a legal name in your regular Goucher work and communications, please follow the guidelines in the Registrar’s Name Change Policy.

Some highlights from this policy include:

  • Employees, including student employees, should update their preferred name choices in Workday using the Change Your Preferred Name job aid.
  • Academic users (such as faculty and students) should enter their preferred first name* in MyGoucher using the steps in the Registrar’s Name Change Policy document.
    • Only enter your preferred first name under “Display Name”. Do not include titles, pronouns or last names in the same field as your chosen first name.
    • Display names in MyGoucher will automatically be updated over time in academic systems such as Canvas, Navigate, DegreeWorks, and the Housing Director.
  • Information on OneCard replacements can be found on the OneCard website.
  • Name changes to email addresses can be requested at helpdesk@goucher.edu. Please note whether you are requesting a new email address or only an alias. If we provide you with a new email address, future emails to your original address will be lost.

Pronouns

While pronouns are added to some of our systems automatically through various data connections, some systems require users to update their pronouns manually if desired. Use the links below for instructions.

How to Connect to Goucher VPN

Description:

VPN, short for Virtual Private Network, is a secure connection from a computer to a private network (such as Goucher College) over the internet. A VPN connection allows users who are away from campus to access files or websites usually only available from computers set up in offices, classrooms, or labs in campus buildings.

Follow these steps to set up a remote VPN connection from an off-campus computer.

Before you begin:

  • VPN will only work from off-campus and does not work when connected to the Goucher network on campus. This includes both GoucherGuest and GoucherWiFi.

Steps:

PC:

  1. Open the Start menu in the bottom left, and type in “Cisco.”
  2. Open the “Cisco AnyConnect Secure Mobility Client” application from the list of results.
  3. If you do not see Cisco in Search, reinstall the application using our Setting Up a VPN Connection guide. You may also find the VPN client under the “Cisco” folder in “All Apps” on your Start menu.
  4. Once open, type in “remote.goucher.edu‘ into the URL window, and click “Connect”
  5. From there, a Microsoft login page will pop-up. Type in your username in the ‘username@goucher.edu‘ format to sign in, and input your password. You may be asked to verify your login using Multi-Factor Authentication. See our article found here for questions on using MFA.
  6. Once signed in, you’ll see a green check-mark on the lock icon in the Cisco AnyConnect window, indicating you are connected to Goucher VPN.

Mac:

  1. Click the Spotlight icon in the top right, on the menu bar and type in “Cisco”
  2. Open “Cisco AnyConnect Secure Mobility Client.app”
  3. If you do not see Cisco in Spotlight Search, reinstall the application from Self Service on your Mac, or otherwise see our Setting Up a VPN Connection guide. You can also find the application within your Applications folder.
  4. Once open, type in “remote.goucher.edu‘ into the URL window, and click “Connect”
  5. From there, a Microsoft login page will pop-up. Type in your username in the ‘username@goucher.edu‘ format to sign in, and input your password. You may be asked to verify your login using Multi-Factor Authentication. See our article found here for questions on using MFA.
  6. Once signed in, you’ll see a green check-mark on the lock icon in the Cisco AnyConnect window, indicating you are connected to Goucher VPN.

Technology Training & Tidbits Newsletters

The training newsletters are your go-to resources for staying up to date with the latest technology, tools, and techniques in an evolving world of technology. It is designed to support you in harnessing the power of technology effectively by providing valuable insights, practical tips, and hands-on workshops to enhance workplace productivity.

Technology Training & Tidbits Newsletters

  • September 2024 – Do More with Shortcuts and Teams Interactive Features
  • August 2024 – Is Your Internet Up to Speed and Out of Offie Replies
  • July 2024 – Summertime Tech Protection and Clipboard History
  • June 2024 – Mastering Email Etiquette and Adding Accents to Fonts
  • May 2024 – Are You Ready for Turnover? and Customize Screenshots with Greenshot and Shottr
  • April 2024 – Puns and Positive Steps for What It’s Earth! and Paste as Plain Text
  • March 2024 – Outlook Search and Quarantined Email
  • February 2024 – Don’t Get Caught with Your Password Down and Locate Shared files in OneDrive
  • January 2024 – 7 Favorite Tips, Tricks and Apps and Excel XLOOKUP

Train The Trainer Resources

As a subject matter expert, your role is crucial in empowering individuals to navigate systems with confidence and proficiency. This blog is designed to provide you with valuable insights, practical tips, and comprehensive resources to enhance your training skills and elevate your impact as a trainer. Our goal is to equip you with the knowledge and tools you need to deliver effective, engaging, and impactful training sessions.

Four Step Training Prep Checklist

The Four Step Training Checklist will help you prepare training materials, presentations and delivery. Use the checklist to help you consider logistics, scripting, presentation design and training delivery. These essential components contribute to a successful training experience for you and your participants.

Click here to view the Four Step Training Prep Checklist.

Design and Deliver Workshops

Using Microsoft Teams in the Workplace or Classroom

Teams is a web-based communication tool offering online calling, video conferencing, chat, and file sharing options. Plus, Teams is included in every Goucher Office 365 account, so it is available to all current faculty, staff, and students. Teams meetings have no real time limitation (30 hours)  and can include non-Goucher guests.


Accessing Teams

Microsoft Teams is included with Goucher Office 365 accounts and can be installed on PCs, Macs, and mobile devices, or used directly in a web browser.

      • Teams software or app*Download Teams for your desktop, iOS, or Android. *Recommended for best experience

        For Windows Desktop downloads choose “Teams for work or school”.

      • A Web Browser – Go to https://teams.microsoft.com.
        The browser client can also be used although it does have limitations when compared to using the installed client software or app above. Chrome or Edge are considered the best browsers for Teams Meetings. Make sure your browser has been updated to the latest version. For more information about supported browsers see Web clients for Microsoft Teams.


Scheduling a Teams Meeting

Similar to other video meeting sites like Zoom, WebEx, GoToMeeting, etc., Teams Meetings are scheduled events that participants join with a link. There are several ways to schedule a meeting using Teams:

      • From Outlook – Use the Teams add-in for Outlook. From your Outlook calendar, create a new meeting or appointment and use the Teams Meeting buttons on the toolbar to include online meeting details in the invitation.
      • From Teams
        • Option 1 – Go to Calendar on the left side of the app and select New meeting in the top right corner.
        • Option 2 – Select a range of time in the calendar. A scheduling form will pop open.
        • Option 3 – Select Schedule a meeting  in a chat (below the box where you type a new message) to book a meeting with the people in the chat.
      • From Canvas – Instructors can use our Canvas Instructor Quick Tip to create a Teams meeting link for students without having to copy/paste or send invitations.


Inviting People Outside of Goucher to a Meeting

Teams lets you invite people outside of Goucher to a meeting, including those who don’t have a Teams license. Anyone joining a meeting without signing into Teams through their Goucher account is considered a “guest”.

      1. Create the meeting  and go to where it says Add required attendees. If anyone is an optional attendee, select Optional instead.
      2. Type the person’s full email address (ex: Joe@example.com).
      3. Select Invite. They’ll receive an email with a link to the meeting.

Other Considerations :

      • When outside participants use the link to join your meeting, they will be given the option to download the Teams app or continue in their browser. Neither of these options requires a Microsoft login to use; however, most users have a better online experience using the app.
      • To protect everyone from mischief makers, guests will need to be admitted through the meeting lobby by default.
      • Outside users will not have access to the meeting chat after the meeting ends.
      • Windows desktop users who already use TEAMS with another organization can avoid joining Goucher meetings as a guest by managing multiple accounts in New Teams. This feature is anticipated for Mac users soon.


Pre-meeting Check: Confirming Your Settings and Making a Test Call

Confirm or change your default mic, speaker, or camera

To select the mic, speaker, and camera you want Teams to use for calls and meetings, select Settings and more  Select to see more options  next to your profile picture at the top of Teams and then choose Settings Devices.

Under Audio devices, pick the speaker and mic you want Teams to use by default.

Under Camera, select the camera you want Teams to use, and see a preview of that camera’s video.

Make a test call

To make a test call, select Settings and more  Select to see more options  next to your profile picture at the top of Teams and then choose Settings Devices.

Choose Make a test call under Audio devices.

In a test call, you’ll see how your mic, speaker, and camera are working. Follow the instructions from Test Call Bot and record a short message. The message will play back for you. After that, you’ll get a summary of the test call, and you can go to your device settings to make changes.

Notes: 

      • The test call feature is only available in English for now. Additional languages are coming soon.
      • Test recordings are deleted immediately after the call. They are not retained or used by Microsoft.
      • The test call feature is currently only available in Teams desktop app for Windows and Mac.


Using Meeting Controls

When a Teams Meeting or Video Chat is in progress, the Meeting Controls toolbar becomes available to all users. Visit the Microsoft support article for details on how to use controls, including options for breakout rooms, meeting recordings, background effects, and more.


Adjusting Your View in a Meeting

Teams tries to anticipate what you’ll want to see in a meeting. If someone starts speaking, their video or profile image is shown more prominently. If someone shares their screen, that content will take main stage. But if you’d rather see something else, there are a few ways to tell Teams.

  • Switch between people and content– If someone’s presenting a PowerPoint or other content, switch between viewing their content and the people in the room by clicking the video or content you want to see.
  • Pin a video– Right-click a video within the meeting and select Pin. The video will be shown regardless of who’s currently speaking. You can pin multiple videos or right-click any pinned video and select Unpin at any time.
  • Reframe a video– Teams may crop your video to better fit the screen. If you want to change this, right-click the video and select Fit to frame to view the entire video. To see a closer, cropped view, right-click the video and select Fill frame.


Creating a Personal Meeting Link Using Meet Now

The Teams calendar has a Meet Now feature for impromptu meetings. After hitting the Meet Now button, prompts appear to enter a meeting name and invite participants by entering their names or copying a meeting link to paste elsewhere. Meet Now meetings do not appear in your calendar.

You can reuse Meet Now links to create a similar experience to the Personal Meeting links in Zoom.

BEWARE:

  • Any chats, meeting notes, or other shared content will be available to everyone in every meeting session with the same name. Participants (not Organizers) can delete their chats from the thread if desired.
  • The default security settings allow anyone at Goucher College to bypass the waiting room. Be sure to change meeting options after the steps below if you don’t want users to join a meeting already in session with another person.
  • Although meeting URLs do not expire, phone dial-in numbers do.

STEPS:

  1. Create a Teams meeting from the Teams calendar using the Meet Now button. Name the meeting something like “Jane’s Personal Meeting”.
  2. Copy the resulting meeting link to your clipboard.
  3. Paste the link in a shareable space, such as in Canvas, Navigate, your e-mail signature, etc., and save it as a bookmark in your browser. You want to have it handy.
  4. Start your meeting at any time using the same link you shared with everyone else. You can reuse the link again even after the first meeting is ended.


Starting a Chat session

Teams comes with a persistent chat area that contains chats to and from other Goucher users. When you participate in meetings, those chats also appear in this area.

      1. Click on the Chat icon on the left, and then select the New Chat button at the top of chat list panel.
      2. Begin typing the name of a Goucher member and select their name when it appears.
      3. Compose a message in the box at the bottom of the chat panel.
      4. When you’re ready, select the Send icon or hit Enter.


Starting an Audio Call or Video Call

Audio and Video calls are started from the Chat window and occur immediately without a meeting link. Think of this as calling someone on the phone. This option is good for quick impromptu conversations within the Goucher community.

      1. Open a chat session with the person(s) you wish to contact (you can select an existing chat session or start a new one). You can include up to 20 people.
      2. Select the Meet Now button on the toolbar and select Audio Call or Video Call to start a call.


Changing Display Name or Adding Pronouns

Users can choose to go by a chosen name rather than their legal name for work or study at Goucher. Please see our post Display Names and Pronouns for more information.

Note that pronouns are not added to the display name in Teams. Instead, pronouns are added to the user’s profile. Click a profile picture to open a user’s profile page and look under their name for any pronouns intentionally added by that user.


Adding a Teams Meeting in a Canvas Course

Follow our Canvas Instructor Quick Tip to create a meeting link for students without having to copy/paste or send invitations.


Overview of Frequently Used Features

Below is a summary of frequently used conferencing features in Teams:

Feature Available in Teams?
Personal meeting room No* See related information above.
Breakout rooms Yes
Polls Through MS Forms
Raise hand Yes
Password protection No
Lobby/Waiting Room Yes *Can setup in Meeting Options
Mobile app Yes
External guests Yes
Recurring meetings Via Outlook
Screen Sharing Yes 
Whiteboard Yes 
Cloud recording Yes
Cloud recordings are stored in OneDrive.
Alternative Host Through roles
Transcripts Yes


Troubleshooting Tips

Here are some self-help tips to resolving most technical issues with Microsoft Teams.

  • For best results, use the Teams app rather than the web version.
  • If you have to use the web version, switch to using Chrome or Edge if necessary and ensure your browser is updated to the latest version.
  • Make sure you are signed into your Goucher Teams account. Signing out of Teams and back in again is also a common fix to many problems. To sign out, select your Profile icon and choose SIGN OUT. Sign back in with your Goucher username@goucher.edu and password.
  • If you are experiencing low internet connectivity issues, try closing other apps that also use your internet bandwidth. You can also reduce the amount of bandwidth needed by turning off your own camera or the video feed from others (click on VIEW on the toolbar, select MORE OPTIONS, and then click TURN OFF INCOMING VIDEO).


Hold for Authentication Error

Hold for Authentication Error – Why this Happens

The “Hold for Authentication” error, as shown below is common on Apple devices. This error is caused when incorrect credentials are entered when going to print. Your Mac by default, will attempt to use the local account name on your computer to login to the printer and save it to the keychain.  If you do not change the name from the Mac login to your Goucher username (ex. in the format of either josmi001 or jsmith) this error will occur. If those credentials are saved to to the keychain, this error will continue to occur on any future print jobs. This error also occurs if your password changes or expires without updating the keychain

Please note, you should always be on GoucherWiFi, not GoucherGuest when printing.

There are two solutions to this issue.

How to Resolve it

1. Refresh the Print Job

This is the easiest and quickest solution, although it may not work on some older Macs. On your dock, there is a printer icon with an exclamation mark as shown.

Click on the printer icon to open up your print queue. From there, you’ll see a list of your current print jobs.

Click the refresh icon,   you should now see a window to enter in a new username and password for the printer.

Remove the default username from the name field, if it’s not your Goucher username. Then enter in your Goucher credentials in the format of ‘josmi001’ (or jsmith for older accounts) as shown below.

Click “Ok” and your print job should begin processing. If the credentials were correct, the print job should disappear from the print queue as shown below. Otherwise if incorrect credentials were entered, the printer will once again show a “Hold for Authentication” error.

1. Delete the saved credentials from your keychain

Note, this is an advanced troubleshooting step. Please contact the Helpdesk if you need assistance with this.

If the above steps do not work for you, it is likely caused by incorrect credentials that have been saved to the keychain. To resolve this, open up Spotlight Search in the top right, type in “Keychain Access.app” then press enter.

In the Keychain Access application that opens, select ‘login’ under ‘Default Keychains’ and then select the ‘Passwords’ tab as shown.

Scroll down until you find the keychain password for the printer, (faculty_print_bw, secure_print_color, etc) The printer password will have an @ symbol next to the name, and will be marked as a “network password.”

Press and hold the Control key while you click on the printer keychain, then select ‘Delete’

Confirm that you want to delete the keychain password. Then, attempt to print again. You should be prompted to enter in new credentials for the printer. Enter in your username in the format of “josmi001” (or jsmith for some staff/faculty) and your Goucher password, as shown.

If you find that you are not prompted for new credentials when going to print, restart your computer and try again.


If you have any further questions, please contact the Helpdesk at Helpdesk@goucher.edu