Teams is a web-based communication tool offering online calling, video conferencing, chat, and file sharing options. Plus, Teams is included in every Goucher Office 365 account, so it is available to all current faculty, staff, and students. Teams meetings have no real time limitation (30 hours) and can include non-Goucher guests.
Accessing Teams
Microsoft Teams is included with Goucher Office 365 accounts and can be installed on PCs, Macs, and mobile devices, or used directly in a web browser.
-
-
- Teams software or app* – Download Teams for your desktop, iOS, or Android. *Recommended for best experience
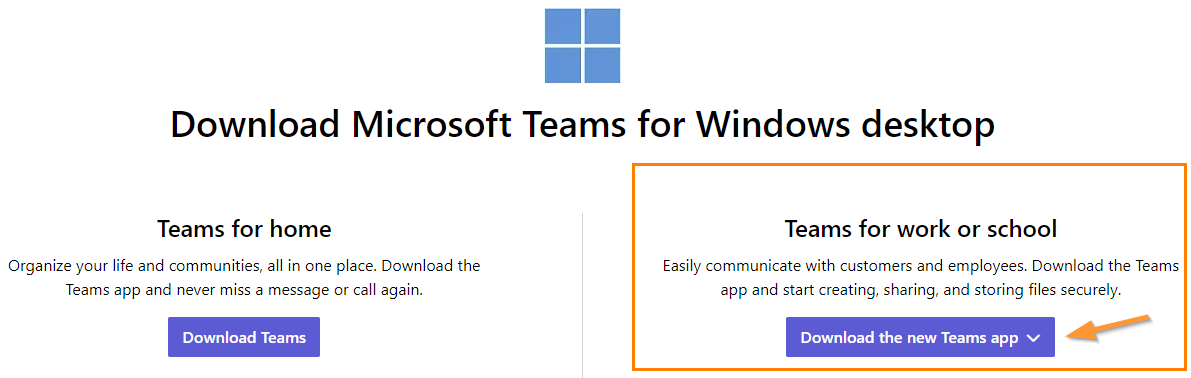
For Windows Desktop downloads choose “Teams for work or school”.
- A Web Browser – Go to https://teams.microsoft.com.
The browser client can also be used although it does have limitations when compared to using the installed client software or app above. Chrome or Edge are considered the best browsers for Teams Meetings. Make sure your browser has been updated to the latest version. For more information about supported browsers see Web clients for Microsoft Teams.
Scheduling a Teams Meeting
Similar to other video meeting sites like Zoom, WebEx, GoToMeeting, etc., Teams Meetings are scheduled events that participants join with a link. There are several ways to schedule a meeting using Teams:
-
-
- From Outlook – Use the Teams add-in for Outlook. From your Outlook calendar, create a new meeting or appointment and use the Teams Meeting buttons on the toolbar to include online meeting details in the invitation.
- From Teams –
- Option 1 – Go to Calendar
 on the left side of the app and select New meeting in the top right corner.
- Option 2 – Select a range of time in the calendar. A scheduling form will pop open.
- Option 3 – Select Schedule a meeting in a chat (below the box where you type a new message) to book a meeting with the people in the chat.
- From Canvas – Instructors can use our Canvas Instructor Quick Tip to create a Teams meeting link for students without having to copy/paste or send invitations.
Inviting People Outside of Goucher to a Meeting
Teams lets you invite people outside of Goucher to a meeting, including those who don’t have a Teams license. Anyone joining a meeting without signing into Teams through their Goucher account is considered a “guest”.
-
-
- Create the meeting and go to where it says Add required attendees. If anyone is an optional attendee, select Optional instead.
- Type the person’s full email address (ex: Joe@example.com).
- Select Invite. They’ll receive an email with a link to the meeting.
Other Considerations :
-
-
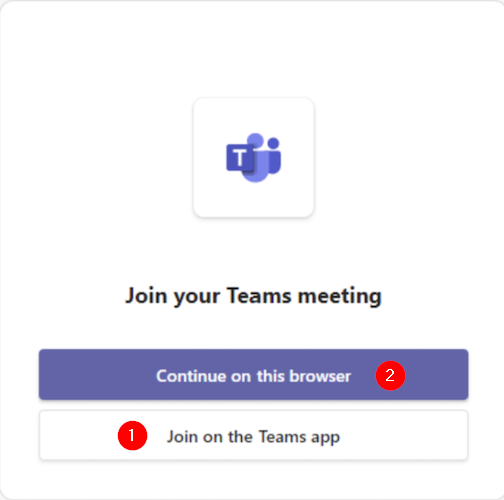
- When outside participants use the link to join your meeting, they will be given the option to download the Teams app or continue in their browser. Neither of these options requires a Microsoft login to use; however, most users have a better online experience using the app.
- To protect everyone from mischief makers, guests will need to be admitted through the meeting lobby by default.
- Outside users will not have access to the meeting chat after the meeting ends.
- Windows desktop users who already use TEAMS with another organization can avoid joining Goucher meetings as a guest by managing multiple accounts in New Teams. This feature is anticipated for Mac users soon.
Pre-meeting Check: Confirming Your Settings and Making a Test Call
Confirm or change your default mic, speaker, or camera
To select the mic, speaker, and camera you want Teams to use for calls and meetings, select Settings and more  next to your profile picture at the top of Teams and then choose Settings > Devices.
Under Audio devices, pick the speaker and mic you want Teams to use by default.
Under Camera, select the camera you want Teams to use, and see a preview of that camera’s video.
Make a test call
To make a test call, select Settings and more next to your profile picture at the top of Teams and then choose Settings > Devices.
Choose Make a test call under Audio devices.
In a test call, you’ll see how your mic, speaker, and camera are working. Follow the instructions from Test Call Bot and record a short message. The message will play back for you. After that, you’ll get a summary of the test call, and you can go to your device settings to make changes.
Notes:
-
-
- The test call feature is only available in English for now. Additional languages are coming soon.
- Test recordings are deleted immediately after the call. They are not retained or used by Microsoft.
- The test call feature is currently only available in Teams desktop app for Windows and Mac.
Using Meeting Controls
When a Teams Meeting or Video Chat is in progress, the Meeting Controls toolbar becomes available to all users. Visit the Microsoft support article for details on how to use controls, including options for breakout rooms, meeting recordings, background effects, and more.

Adjusting Your View in a Meeting
Teams tries to anticipate what you’ll want to see in a meeting. If someone starts speaking, their video or profile image is shown more prominently. If someone shares their screen, that content will take main stage. But if you’d rather see something else, there are a few ways to tell Teams.
- Switch between people and content– If someone’s presenting a PowerPoint or other content, switch between viewing their content and the people in the room by clicking the video or content you want to see.
- Pin a video– Right-click a video within the meeting and select Pin. The video will be shown regardless of who’s currently speaking. You can pin multiple videos or right-click any pinned video and select Unpin at any time.
- Reframe a video– Teams may crop your video to better fit the screen. If you want to change this, right-click the video and select Fit to frame to view the entire video. To see a closer, cropped view, right-click the video and select Fill frame.
Creating a Personal Meeting Link Using Meet Now
The Teams calendar has a Meet Now feature for impromptu meetings. After hitting the Meet Now button, prompts appear to enter a meeting name and invite participants by entering their names or copying a meeting link to paste elsewhere. Meet Now meetings do not appear in your calendar.
You can reuse Meet Now links to create a similar experience to the Personal Meeting links in Zoom.
BEWARE:
- Any chats, meeting notes, or other shared content will be available to everyone in every meeting session with the same name. Participants (not Organizers) can delete their chats from the thread if desired.
- The default security settings allow anyone at Goucher College to bypass the waiting room. Be sure to change meeting options after the steps below if you don’t want users to join a meeting already in session with another person.
- Although meeting URLs do not expire, phone dial-in numbers do.
STEPS:
- Create a Teams meeting from the Teams calendar using the Meet Now button. Name the meeting something like “Jane’s Personal Meeting”.
- Copy the resulting meeting link to your clipboard.
- Paste the link in a shareable space, such as in Canvas, Navigate, your e-mail signature, etc., and save it as a bookmark in your browser. You want to have it handy.
- Start your meeting at any time using the same link you shared with everyone else. You can reuse the link again even after the first meeting is ended.
Starting a Chat session
Teams comes with a persistent chat area that contains chats to and from other Goucher users. When you participate in meetings, those chats also appear in this area.
-
-
- Click on the Chat icon on the left, and then select the New Chat button at the top of chat list panel.
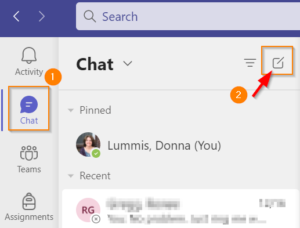
- Begin typing the name of a Goucher member and select their name when it appears.
- Compose a message in the box at the bottom of the chat panel.
- When you’re ready, select the Send icon or hit Enter.
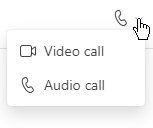
Starting an Audio Call or Video Call
Audio and Video calls are started from the Chat window and occur immediately without a meeting link. Think of this as calling someone on the phone. This option is good for quick impromptu conversations within the Goucher community.
-
-
- Open a chat session with the person(s) you wish to contact (you can select an existing chat session or start a new one). You can include up to 20 people.
- Select the Meet Now button on the toolbar and select Audio Call or Video Call to start a call.
Changing Display Name or Adding Pronouns
Users can choose to go by a chosen name rather than their legal name for work or study at Goucher. Please see our post Display Names and Pronouns for more information.
Note that pronouns are not added to the display name in Teams. Instead, pronouns are added to the user’s profile. Click a profile picture to open a user’s profile page and look under their name for any pronouns intentionally added by that user.
Adding a Teams Meeting in a Canvas Course
Follow our Canvas Instructor Quick Tip to create a meeting link for students without having to copy/paste or send invitations.
Overview of Frequently Used Features
Below is a summary of frequently used conferencing features in Teams:
| Feature |
Available in Teams? |
| Personal meeting room |
No* See related information above. |
| Breakout rooms |
Yes |
| Polls |
Through MS Forms |
| Raise hand |
Yes |
| Password protection |
No |
| Lobby/Waiting Room |
Yes *Can setup in Meeting Options |
| Mobile app |
Yes |
| External guests |
Yes |
| Recurring meetings |
Via Outlook |
| Screen Sharing |
Yes |
| Whiteboard |
Yes |
| Cloud recording |
Yes
Cloud recordings are stored in OneDrive. |
| Alternative Host |
Through roles |
| Transcripts |
Yes |
Troubleshooting Tips
Here are some self-help tips to resolving most technical issues with Microsoft Teams.
- For best results, use the Teams app rather than the web version.
- If you have to use the web version, switch to using Chrome or Edge if necessary and ensure your browser is updated to the latest version.
- Make sure you are signed into your Goucher Teams account. Signing out of Teams and back in again is also a common fix to many problems. To sign out, select your Profile icon and choose SIGN OUT. Sign back in with your Goucher username@goucher.edu and password.
- If you are experiencing low internet connectivity issues, try closing other apps that also use your internet bandwidth. You can also reduce the amount of bandwidth needed by turning off your own camera or the video feed from others (click on VIEW on the toolbar, select MORE OPTIONS, and then click TURN OFF INCOMING VIDEO).