Workday is an enterprise software solution that will replace a number of Goucher’s administrative applications, including finance, human resources, payroll, and budget planning and reporting.
View details about the Workday project at:
Workday is an enterprise software solution that will replace a number of Goucher’s administrative applications, including finance, human resources, payroll, and budget planning and reporting.
View details about the Workday project at:
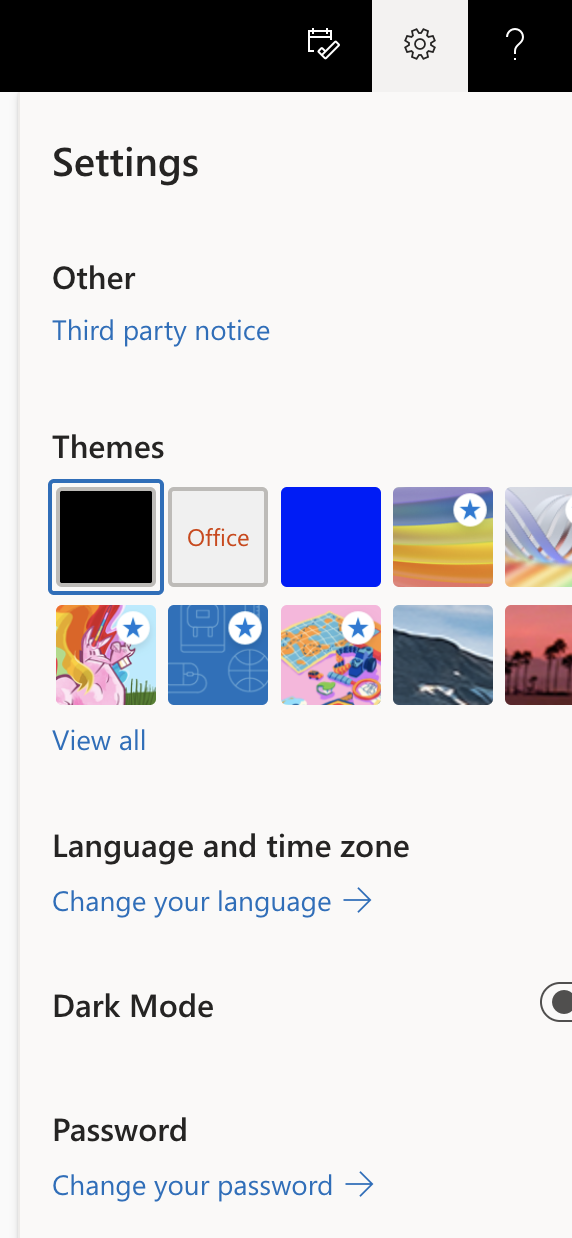
Change your password from the Office365 portal

Office365 Login Page
Setting up Multi-Factor Authentication
Change your password
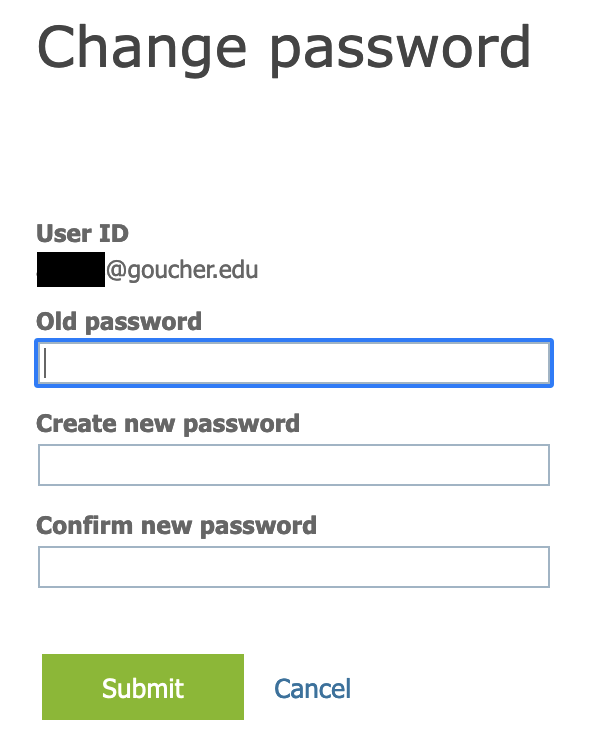
Change password window
Change your password from your Outlook inbox

Password tile
Change password window
Reset your password from the Office365 login page
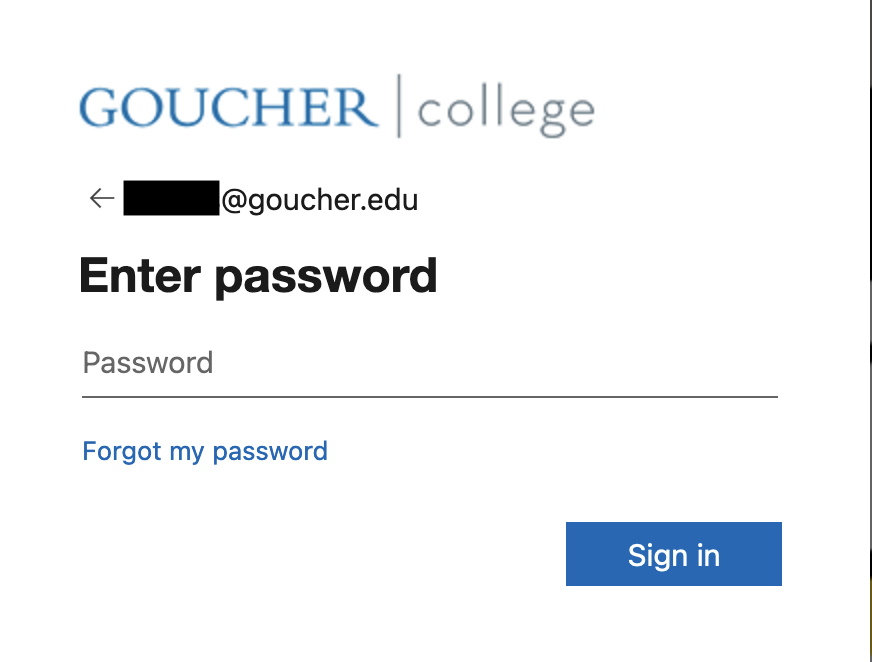
Forgot my password reset
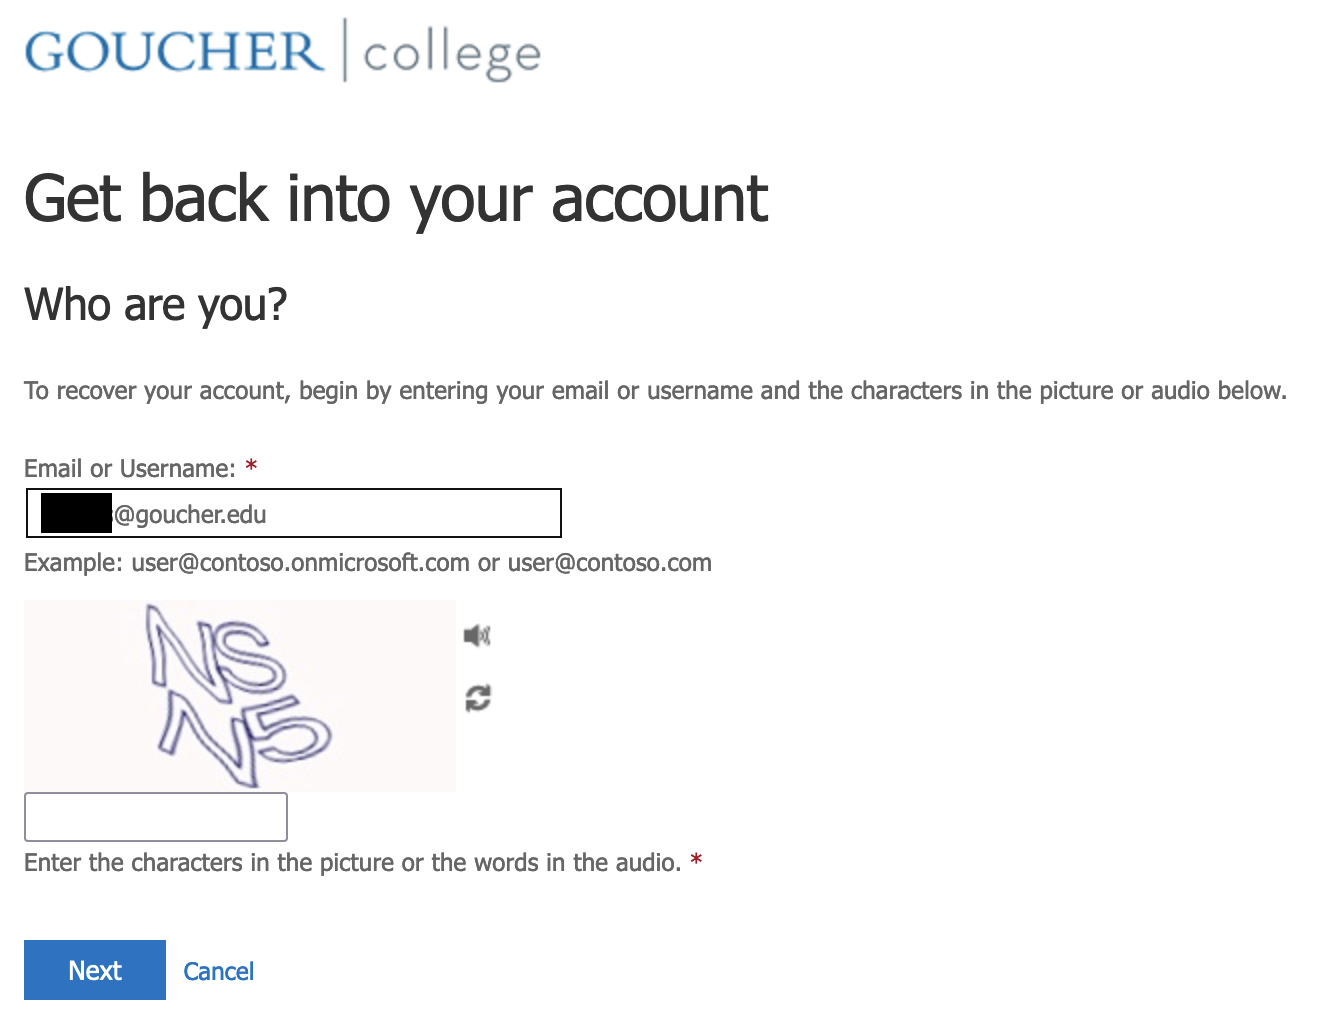
Account Recovery
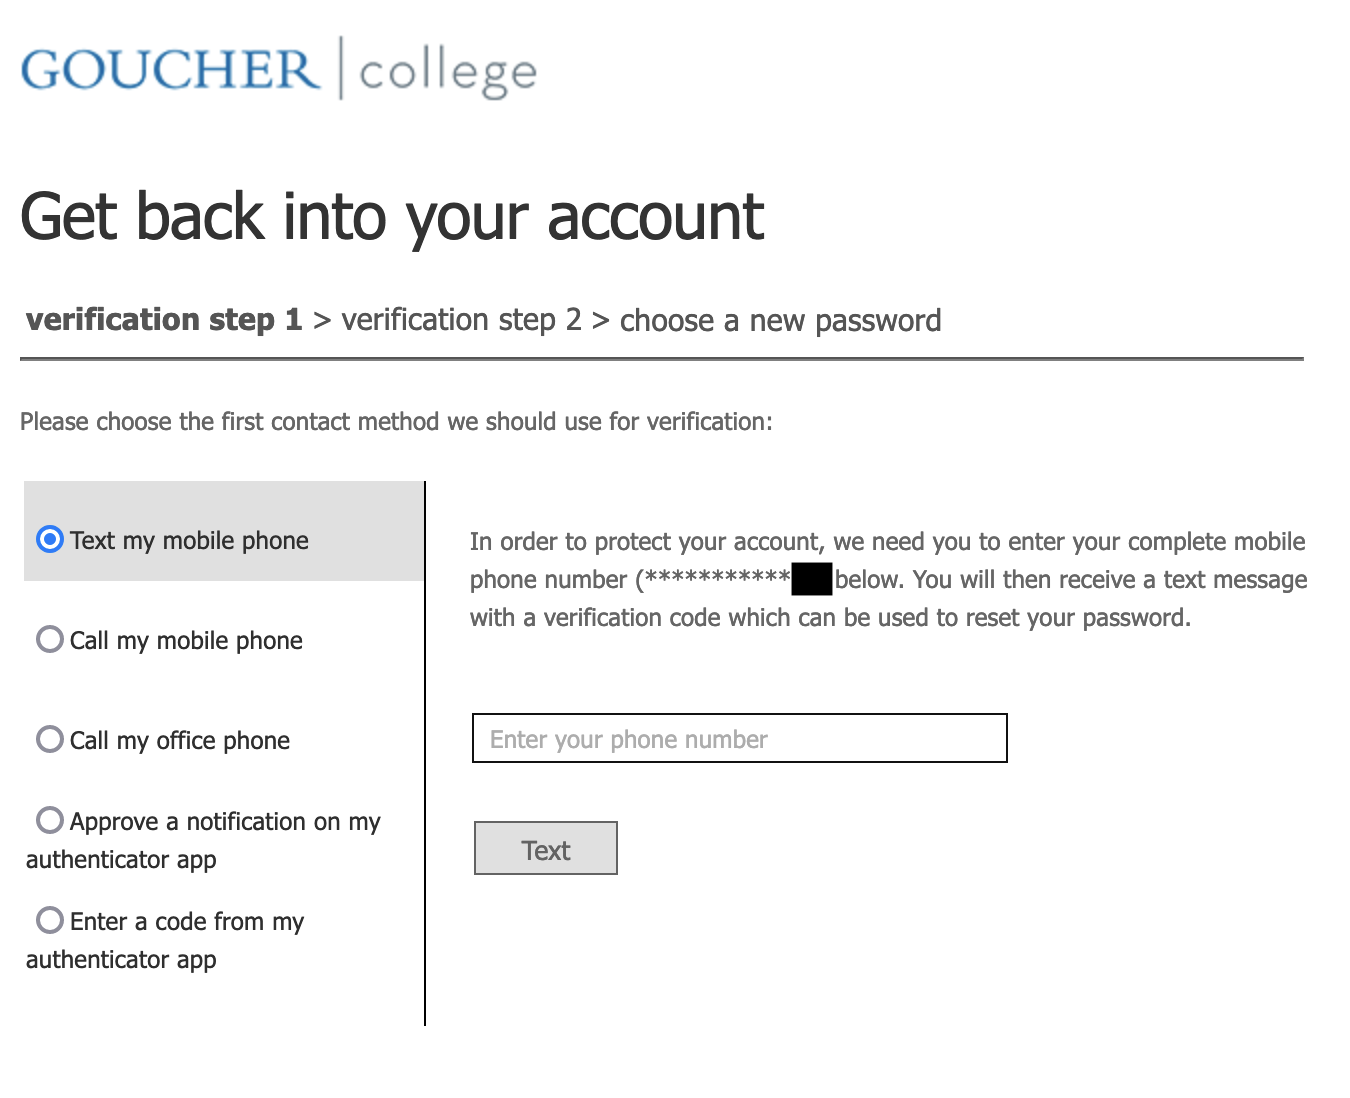
Verification methods
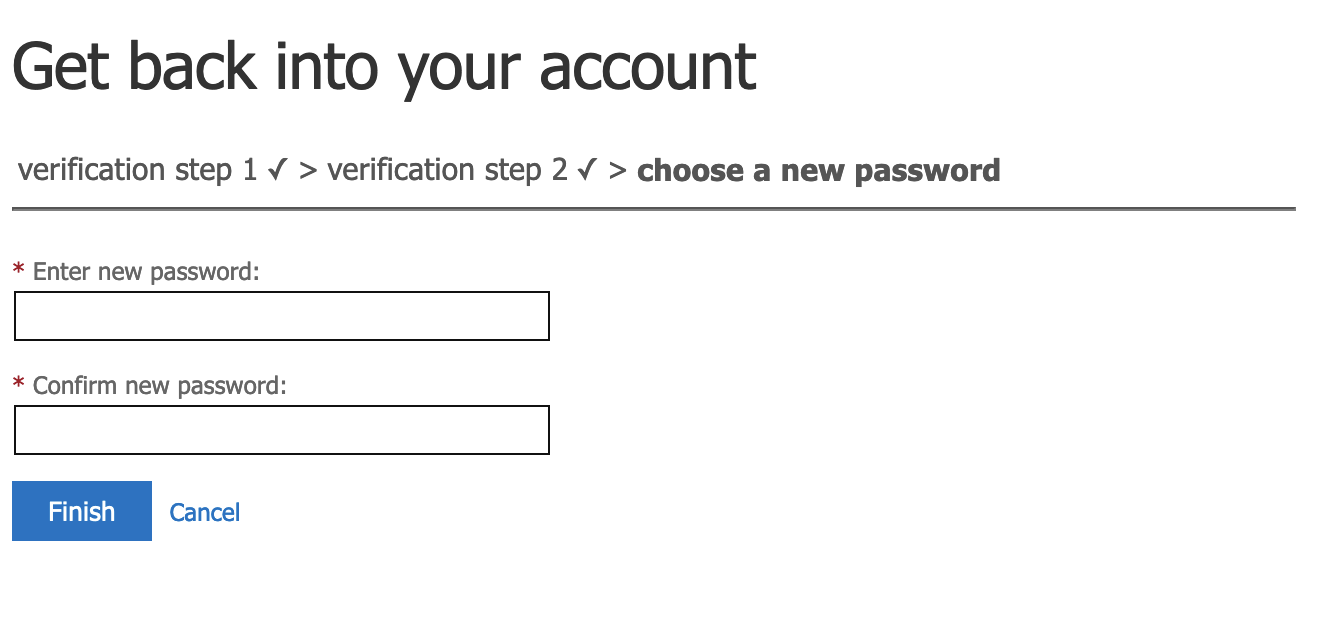
Reset password
If you are unable to reset your password using the Office 365 reset password link, please contact the Helpdesk for assistance at 410-337-6322
Need further assistance? First check out the Password Management FAQs page.
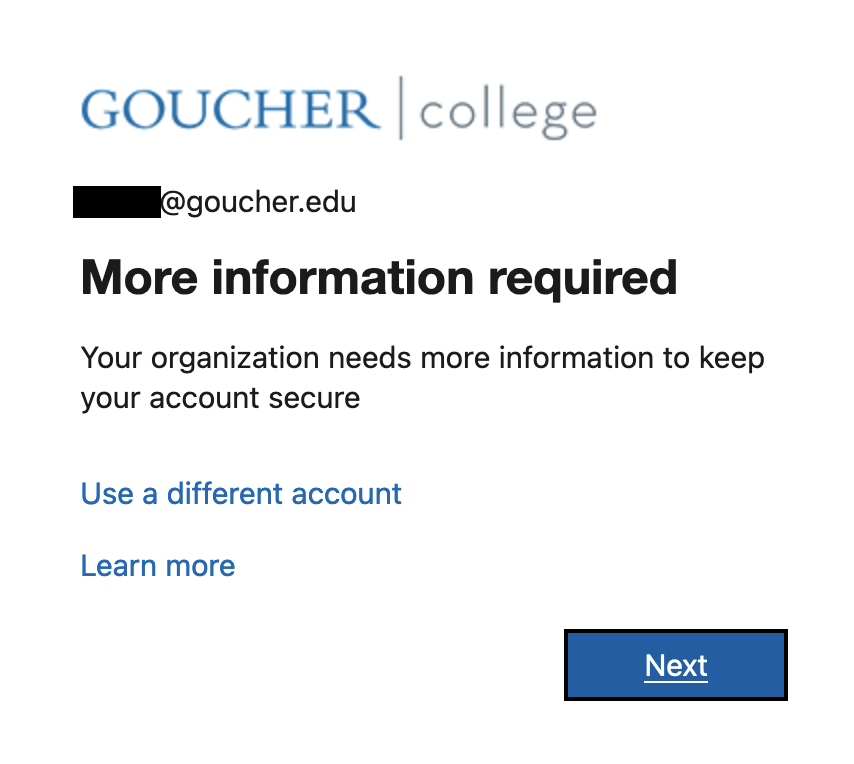
Recently, cybersecurity has become a priority for businesses, government, and schools which is why Goucher has included this as part of the new strategic plan. One of the first cybersecurity projects Information technology (IT) is implementing is Multi-Factor Authentication (MFA).
MFA is a two-step process of providing access to a website or application for an added layer of security. Banks, colleges, and more now require MFA and most likely you’ve already gone through this process for at least one site outside Goucher.
To help ensure the security of email and data, IT began implementing MFA via a phone app called Microsoft Authenticator. Other than the added security that comes from adding MFA to your account, there are other advantages:
Please review the following information prior to setting up MFA:
In most cases, you will only be prompted every 90 days to verify your identity. Students living on campus will be prompted at least once every 7 days. This will occur for each device. For instance, if you use the Outlook app on your phone, you will need to approve access. If you then access your email through a browser, you will again be prompted to approve access. There are other situations that will trigger a new authentication request. . Please review the FAQs for more information.
MFA will only work with certain email apps on mobile devices. The following apps support modern authentication:
Make sure you have the latest OS or application version installed on your device prior to setting up MFA.
MFA will only work with Office 2016 or higher or Office 365. If you are running Office 2013 for Windows or Office 2011 or lower for Macs, on your Goucher-managed laptop, contact the Help Desk to upgrade your system. If you are using Office on a personal computer to check your Goucher emails, please make sure that you are running at least Office 2016 (for Windows users) or Office 365 (for Windows and Mac users). Office 365 can be installed on personal computers for work at home use. For those who cannot upgrade or install Office 365 on your personal computer, you will need to use the web-based version of Outlook to check messages.
Instructions on how to take advantage of Microsoft’s Office 365 home use option
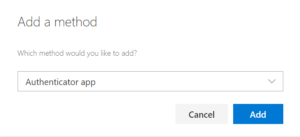
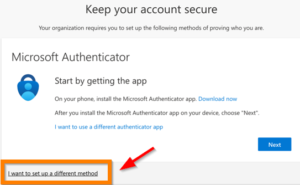
Two authentication methods are needed to be set up to fulfill MFA requirements. Entering your password and setting up one of the methods below is not enough to fulfill MFA requirements. You will need to set up both the authenticator app and the phone methods. The only exception is if you have a non-smartphone device. In that case, only set up the phone method.
Once you have reviewed this information, go to Setting Up Multi-Factor Authentication for instructions.
Have more questions? Review the Multi-Factor Authentication FAQs page.
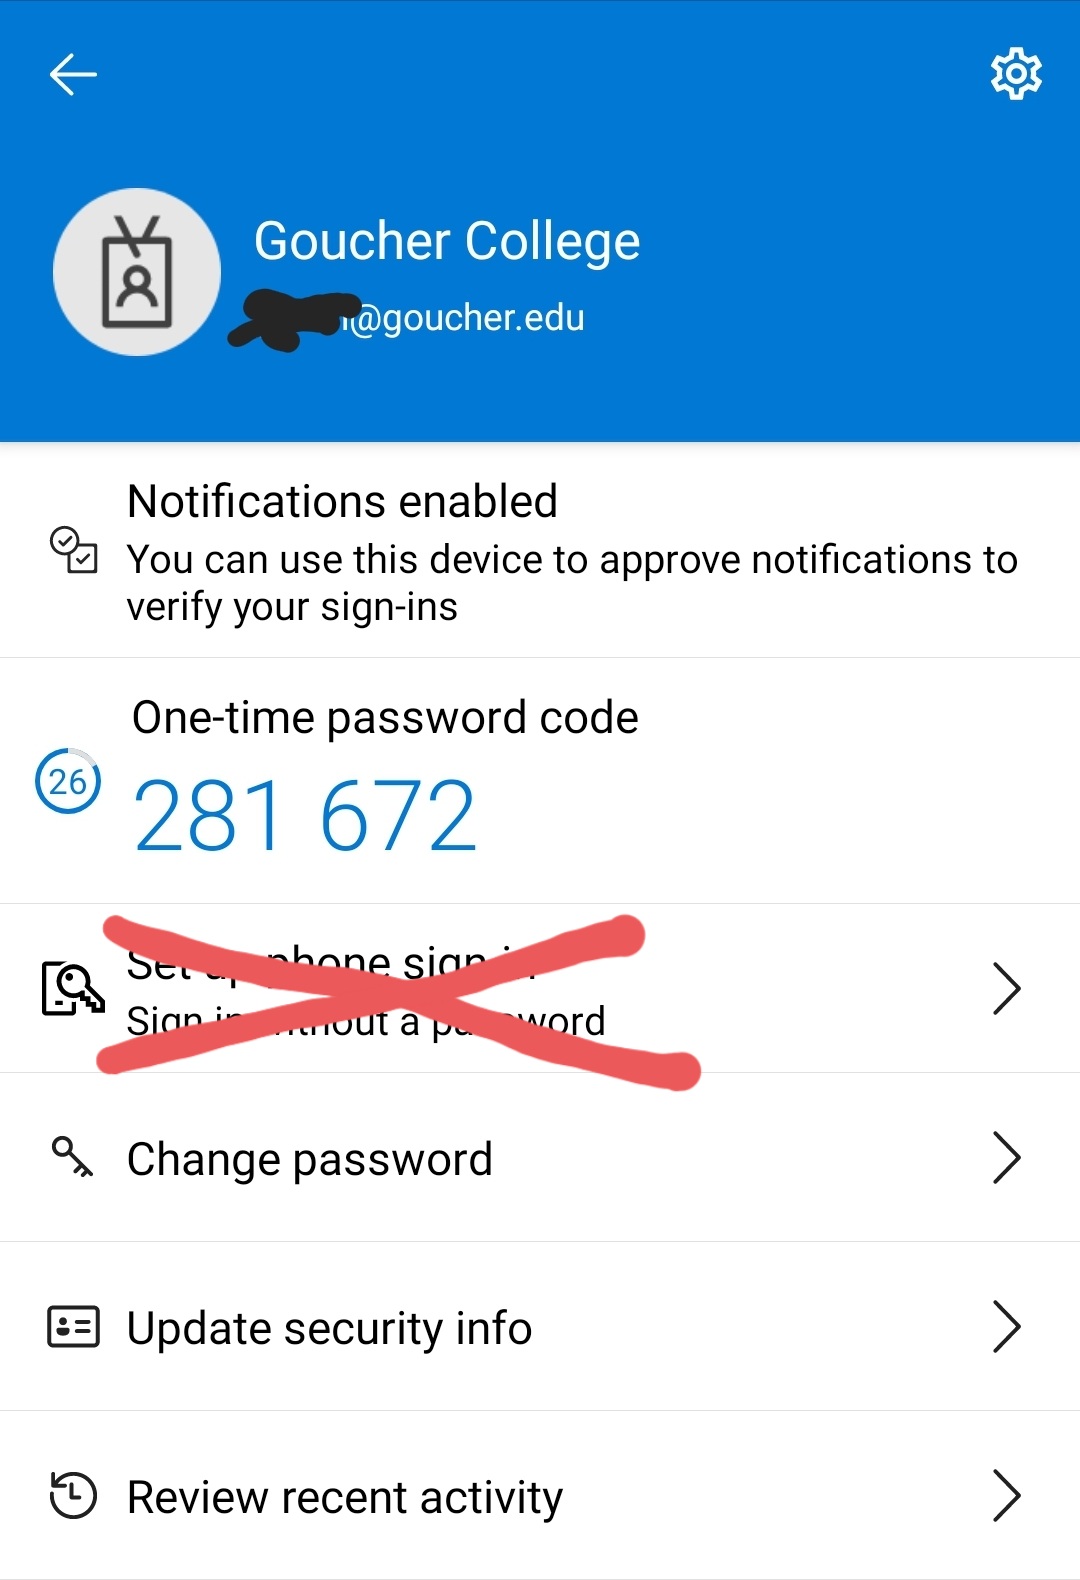
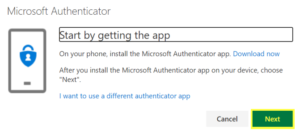
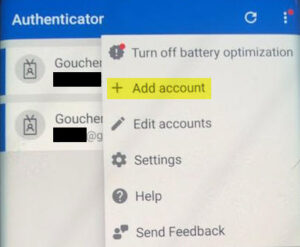
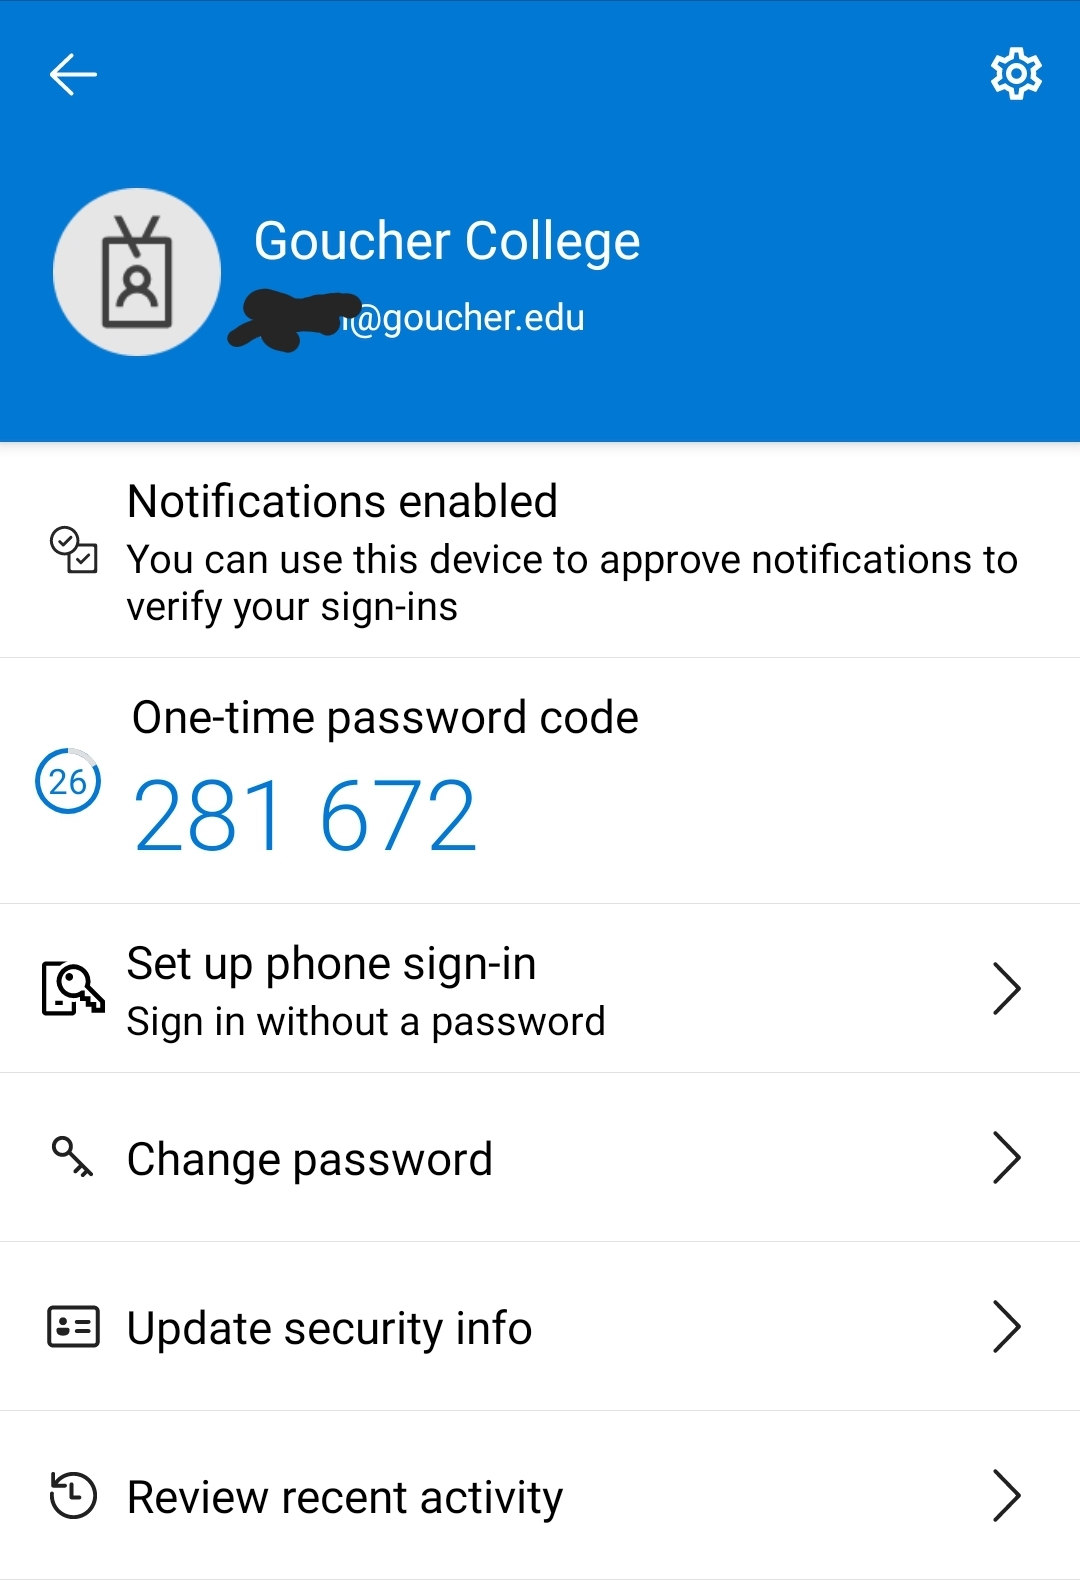
Microsoft Authenticator is a free mobile device application that can be downloaded from Google Play or Apple store. The app notifies you if access to an Office 365 application is being attempted. If you did not initiate the access, you then select the option to not approve it. If you did, then you select “Yes” and you will be given immediate access.
The app also provides a one-time password code in case you need another way to verify your identity. The code changes every 30 seconds for added security.
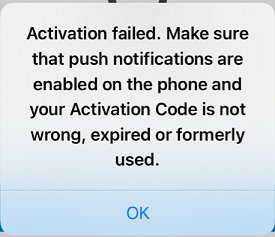
In order for the authenticator app to work properly, it needs to be able to send you notifications when it needs you to approve access to an Office 365 application. If you see the message below, go to your phone settings and make sure that push notifications are enabled for the authenticator app.
You may also need to make sure that the app has access to your camera if you need to scan a barcode to complete the setup.
Cyber attacks are more prevalent than before. Goucher needs to take steps in order to prevent any major threats. Setting up MFA is one of many IT projects that will be implemented to address cyber security as part of the strategic plan.
If you get an invalid link when you scan the barcode or are not able to find “Microsoft Authenticator” app in the Google Play or Apple store, you can use the following links:
Apple Store: https://apps.apple.com/us/app/microsoft-authenticator/id983156458
Google Play: https://play.google.com/store/apps/details?id=com.azure.authenticator&hl=en_US&gl=US
Access this link from a browser on your phone and it should bring you to the correct app. If you continue to experience a problem, please contact the Help Desk.
This may cause a problem. We recommend you remove the Goucher email account and make sure your phone is running the latest operating system before going through the instructions.
For instructions on how to remove and add your Goucher account back to your phone please check the following link https://blogs.goucher.edu/knowledgebase/2018/07/05/adding-your-office-365-email-account-to-your-mobile-device/
As you know, a password is one of the easiest things that can get hacked. Therefore, we cannot rely on passwords alone. Providing two additional methods provides a backup method just in case you experience a problem with the other.
For instance, You set up the authenticator and phone as your MFA methods. If for some reason the authenticator app doesn’t work, you can then select to use the phone method to receive your verification code.
Although the authenticator app is one of the preferred methods, we understand that not everyone has a capable phone. If that’s the case, you should only set up the phone method to receive your verification code via phone or text.
The Mail client is not as reliable as the Outlook app. It is highly recommended you use the Outlook app to avoid any problems.
Make sure you’re using the Outlook app instead of the Mail app if you’re an iPhone user.
If you are using the Outlook app, remove the Goucher email account and add it back in. If you continue to experience a problem, contact the Help Desk.
There could be several reasons for this:
The phone method can only be set up through the MFA Setup website. The phone sign-in is another option that the authenticator app provides that we are not implementing at this time.
Important Related Links: What is Multi-Factor Authentication and Why Do We Need It? and Setting Up Multi-Factor Authentication
Locate the USB cable connected to the webcam

Connect the cable to your laptop’s USB port. If using a laptop equipped with a USB-C port, then use the USB hub that was provided with your laptop.

If the connected webcam is not detected by default, navigate to the bottom of the screen.
Click the arrow next to the “Stop Video” icon.

Select the USB webcam in use. For example, “AUKEY PC- LM1E Camera,” or “Logitech C920.”
To use the connected webcam’s microphone, navigate to the bottom of the screen.
Click the arrow next to the “Mute” icon.

Under “Select a Microphone” click the microphone corresponding to the make and model of the webcam. For example, “AUKEY PC-LM1E.”
Under “Select a Speaker” click on the appropriate speaker output. For example, “HDMI” if using the AV system.
How to Connect Your Windows Laptop
How to Connect Your MacBook (Coming Soon)
Review the information provided in the What is Multi-Factor Authentication and Why Do We Need IT? article prior to going through these instructions. Also, take the time to review the instructions before going through the steps.
Everyone must visit the MFA Setup Page to configure at lease one secondary verification method. You can choose to use the Microsoft Authenticator app (Option 1 below) and/or choose a text or call to your phone (Option 2 below). Best practice is to set up both using the Microsoft Authenticator App as the default method with a phone verification (SMS or Call) as a backup.
Please read the instructions below carefully prior to following the steps.
Once installed, this will be set as your default sign-in method. You can change this if you prefer to use a different method as your default.
Tip: If you are not able to scan the QR code or are denied access, you can still receive approval by providing the one-time password code found in the Microsoft Authenticator app.
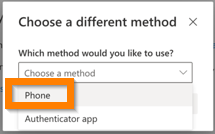
As a backup option to the Microsoft Authenticator app, it is recommended to add a second method. To receive a phone call or text to verify your identity, follow these steps:
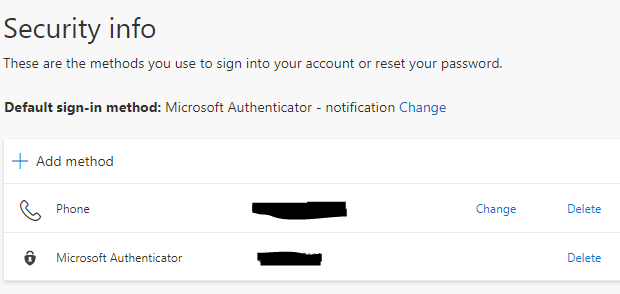
Your Security info page should look like this once both methods are set up:
Once all the methods are set up, you can then attempt to access your Goucher email. If you are off-campus, you should be prompted to enter your password, then an option should appear to verify your identity. Here’s how the app should look once it’s been set up:
If the authenticator app is installed on your phone and set as the default sign-in method, then you’ll be prompted to approve access. If you selected a different identity method, then a verification code will be sent via text or phone call.
You will only be prompted for MFA once the feature is enabled for your account. If you do not receive a prompt while off-campus then it hasn’t been enabled for you yet.
Troubleshooting tip: If you already have your Goucher email setup on your phone, you may experience a problem with the authentication. If that is the case, remove the Goucher account from your email app then add it back again.
For instructions on how to remove and add your Goucher account back on your phone please check the following link https://blogs.goucher.edu/knowledgebase/2018/07/05/adding-your-office-365-email-account-to-your-mobile-device/
Please contact the Help Desk at helpdesk@goucher.edu if you experience a problem during setup.
Important Related Links: What is Multi-Factor Authentication and Why Do We Need It? and Multi-Factor Authentication FAQs
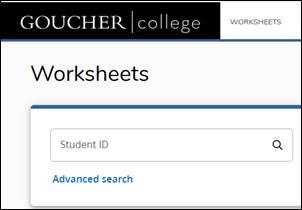
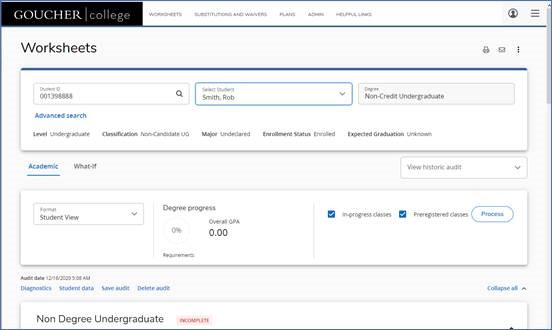
Go to http://degreeworks.goucher.edu and log in with your Goucher username and password.
You’ll then see a student search page. If you know the student’s ID number, you can enter it here. If you want to search by name, click Advanced search.
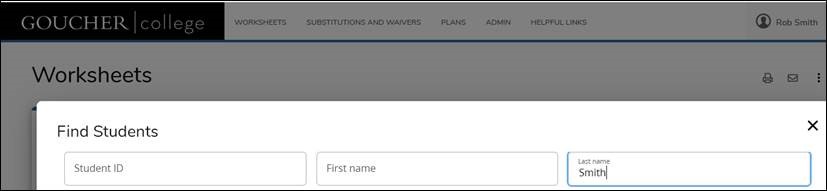
Clicking Advanced search will open the following screen. Enter the student’s name. Both names don’t need to be entered. After entering the name, click the Search button.
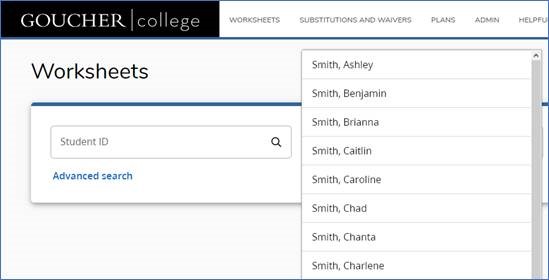
A list of students that match your search will be displayed. All students that match are checked by default. You can uncheck all the names by clicking the check box next to the “Id” column and then re-select just the student you want to review.

Clicking the Select button at the bottom left will take you back to the Worksheets page.
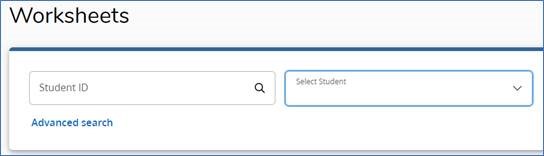
To start reviewing audits, click on the Select Student box and choose from the list of students.
If you have any questions or experience any issues, please contact the helpdesk at x6322 or at helpdesk@goucher.edu.
PDFelement is an alternative application to Adobe Acrobat. It allows you to create, edit, sign, convert, and OCR documents. We are currently testing this application with a limited number of licenses. Here are some common questions that will help current users.
What is the difference between PDFelement and Acrobat?
The main difference is that Acrobat is a product of Adobe and PDFelement is provided through a company called Wondershare. Wondershare has created PDFelement as a low-cost alternative to Acrobat while providing all of the same features that Acrobat provides. Anything that you’ve been able to do in Acrobat, you will be able to do with PDFelement.
I need to add my signature to documents. Can I get a PDFelement license?
Not necessarily. Since we have limited licenses, we can only provide it to faculty and staff who do a lot of editing of PDFs. You do not need PDFelement to add signatures to a document. Adobe Reader provides that functionality as well as commenting and some editing features. If you’re not sure if Adobe Reader will do everything you need, please contact the Help Desk for guidance.
I get a message about a watermark when I try to save a document? How do I fix this?
You could be getting this message because PDFelement is unable to verify the license. Please check the upper right corner to make sure that your username is listed. If it states “Log in” then your license isn’t applied. Click the Log In button and enter your Wondershare ID and password. Note: This is different from your Goucher username and password.
My Goucher username and password aren’t working to login. Do I need to reset my password?
Your Goucher username and password will not work with PDFelement. When the license was first assigned to you, you should have received an email with your Wondershare ID and your initial password. Your Wondershare ID will always be your Goucher email address in the format firstname.lastname@goucher.edu. You should always change your initial password to prevent anyone else from logging in as you. If you can’t remember your Wondershare password, click Log In to access the Account window. Then click the Forgot Password? link and follow the steps to reset your password.
I get an error when I try to add a signature after combining PDFs? What am I doing wrong?
You are doing the steps correctly. There is a known bug that is causing the error. Here is a workaround until the bug is fixed:
How can I find out how to use PDFelement?
Wondershare has an extensive video library on their YouTube channel. You can access it by going to Wondershare PDFelement.
Can I install PDFelement on more than one computer?
You can install PDFelement on as many computers as you like. However, Wondershare only allows you to be logged in on two computers at a time. So, if you want to use a different computer then you’ll need to log off one or the license will be revoked as soon as you sign in on another computer.
PDFelement takes a while to load on my computer. Why is that?
We’ve noticed that this happens mainly on Windows computers for some reason. Although Wondershare stated that they improved the performance, it still opens slower than expected. One reason why it could take longer is because once PDFelement launches, it has to check in with the Wondershare licensing server to make sure that a) your license is valid and b) your license is not active on more than two devices. Once it does that, any subsequent documents that you open or save tend to process much quicker.
I’m getting errors for things I’ve done before. What could be causing this?
Make sure you’re running the latest version of PDFelement. Wondershare will usually prompt if there’s an update. You can select “Later” but then you’re also be delaying a fix that you need. Take the time to run the updates as they come quite regularly. If after installing the latest updates and you still get an error, please open a ticket with our Help Desk so we can reach out to Wondershare support for a possible fix.
This guide was created to prepare you for working at home if needed and to provide some troubleshooting tips if you’ve started to encounter some technical problems.
Click the FAQ title to access the information for that section.
Goucher College provides basic* Zoom accounts to all faculty, staff, and students. *For meetings over 40 minutes long, Goucher used Microsoft Teams.* Use the following instructions to get started, test your settings, see tips, or get technical assistance.
Accounts are created automatically the first time a user logs in successfully on our site.
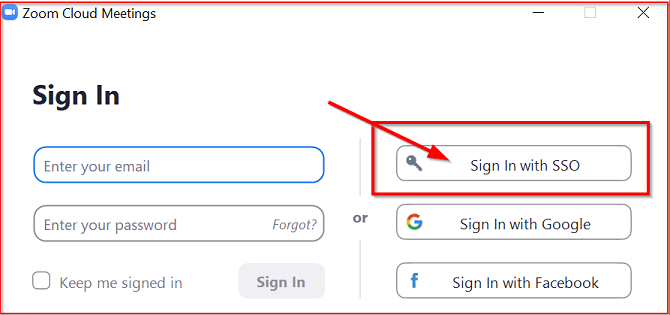
Once your account is created (see above), you will often be prompted to “Open Zoom Meetings” to join or run meetings using the Zoom desktop software. Should you need to sign-in from the software screen, click the “Sign In with SSO” button, and then type goucher as the company domain to proceed.
You can join a test Zoom meeting to familiarize yourself with Zoom controls and test your microphone/speakers before joining a Zoom meeting. You can also test your video or audio while in a Zoom meeting. Note that users in a Zoom test meeting are added as participants, not hosts, so host features such as sharing and recording are not available for testing.
The Outlook Plug-in for Zoom is available to add to your Outlook calendar for synchronized meeting scheduling. The plug-in is available to download and install on the Goucher Zoom site meetings screen. When prompted to Sign In, click the “Sign in with SSO” button underneath the password fields, and then type goucher as the company domain to proceed.

Zoom hosts can enable a side panel in their meetings that automatically transcribes spoken words to text for participants to follow (much like closed captioning). Here’s how…
IN-MEETING FOR HOSTS
When hosting a meeting, click the LIVE TRANSCRIPT button on the host toolbar (1), and then select ENABLE AUTO-TRANSCRIPTION from the pop-up window (2). If your window is too small to display the entire host toolbar, you will need to click the MORE (3) button first.
![]()
IN-MEETING FOR PARTICIPANTS:
When enabled by the host, you will see a notification above Closed Caption/Live Transcript in the meeting controls, informing you that one of these services is available. If live transcription is available, click Live Transcript, and then select Show Subtitle.
VIEWING IN CLOUD RECORDINGS:
Audio transcription is turned on for cloud recordings by default*. When recordings are played, the transcribed text appears on the right-hand side of the video. To display the transcript as closed captions while playing a recording, click the CC icon at the bottom right of the screen.
*Note that the audio transcript may take additional time to process after the cloud recording video/audio has processed.
For more detailed information on downloading, viewing, and editing audio transcription saved to a cloud recording, visit this Zoom Support article.
Have a question about using Zoom? We rely on the Zoom Help Center to provide technical assistance for our Zoom users. Refer to this this page first for helpful instructions, training videos, and answers to questions about how to use Zoom. The video tutorials are particularly useful.
Goucher users can submit a support request to Zoom by online submission or by initiating a chat using the chat bubble available on the Zoom web page.
Questions not answered after contacting the Zoom Help Center should be directed to helpdesk@goucher.edu.