Category Archives: Faculty/Staff

I received an email in my inbox I believe to be spam/phishing. What do I do?

Even with a spam server in place, there may be a small amount of spam and/or phishing messages that will still get through to your inbox.  By using the steps below, you can help us block these emails from coming through in the future. *Note: These steps do not work on mobile devices such as phones or tablet apps.

How to Report Spam/Phish Email

IT recently enabled a protection feature within Outlook that allows you to report spam/phishing emails. These quick and easy steps will help Microsoft identify which emails are spam/phishing and will eventually prevent them from coming through again.

  1. Select the email in your inbox that you believe to be spam/phishing.
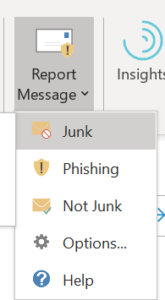
  2. On the Home tab, click Report Message and then select Junk if it’s spam or Phishing if it’s an email that is trying to collect private information.

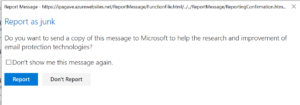
  3. Then select Report when prompted.

The spam email will be moved to the Junk Email folder and reported to Microsoft. The Phishing email will be reported to Microsoft then you can delete it.

Keep in Mind…

  • You may still continue to get the same email until Microsoft is able to completely block the sender.
  • You can also report email as safe if you find that it’s being caught by quarantine.
  • If you still experience a problem, please contact the Help Desk for further assistance.

Laptop Locker FAQs

Q: I tried to check out a laptop, and it’s telling me I’m not able to! What’s wrong?

A: There are several reasons you might not be able to check out a laptop. Please contact us at helpdesk@goucher.edu, and we’ll figure out what the issue is as soon as possible.

Q: How do I know if the locker recognizes that I returned a laptop?

A: After returning a laptop, you should see a screen on the locker display that shows a summary of how long you’ve had the laptop. You should also receive an email confirmation that states the date and time you returned the laptop. If this screen does not pop up, please contact us at helpdesk@goucher.edu to see what could be preventing a successful return. Please keep in mind that if you do not connect the charger cable, it is still considered checked out and will still count toward your time limit.

Q: I just checked out a laptop, but it doesn’t turn on.

A: First, try pressing the power button to turn it on. The power button for the Lenovo laptops is located on the right side of the laptop. Sometimes, a previous borrower may have shut down the laptop before returning it! If it doesn’t power on, return it and check out another one. Sometimes, the laptops aren’t inserted into the kiosk bay correctly and don’t charge. Returning it to the locker will likely allow it to charge again.

Q: How do I borrow a laptop for longer than 6 hours?

A: There is no way to borrow a laptop for longer than 6 hours without incurring late fees. You can return the laptop during the 6 hours and immediately check out another one if they are available.

Q: Can I have someone else return the laptop for me?

A: The laptop must be returned by the person who borrowed it. You are asked to swipe your OneCard when you check it out and again when you check it back in. If you give your OneCard to someone to check out a laptop for you, you are violating the borrowing terms and the person returning it may lose access to the locker. Please note, as the owner of the OneCard used to check out the laptop, you are held responsible for loss or any damage that may occur.

Q: I returned the laptop but forgot to connect the charger. What do I do?

A: Contact the Help Desk at helpdesk@goucher.edu immediately. If you continue to check out a laptop without plugging in the charger, you may be charged a late fee.

Tips to Help Minimize Printing Problems

Copiers will jam from time to time for a variety of reasons. However, there are ways that we can minimize this and other problems. Here are some tips provided by our vendor, One Source:

Gently close the cassette trays. The trays are designed to close on their own with a slight push. If you push the trays too hard, the internal mechanisms can break causing the copier to not recognize that there’s paper in that tray or worse. This can then cause it to want to bypass the tray and use the multipurpose tray.

Make sure that the correct paper type in the printer driver is selected. If you are printing on regular 8.5 x 11 size paper, the default paper size should be set to “Letter” and paper type (also called “media” type) set to “Unspecified” or “Plain.” Only if you are printing on special paper should you change these options. This will allow the copier to adjust the temperature and default to using the appropriate cassette tray.

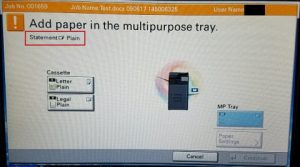
If you are not using special paper and are still prompted to use the multipurpose tray, check the screen to see which paper type it is detecting from your printer drivers. As you can see in the screenshot below it is detecting “Statement” as the paper type and therefore wants to default to the multipurpose tray.
If this happens, select the tray that you want to use on the screen then make sure to change the options in your printer drivers so this will not happen again.

Place paper in the cassette tray or storage bin. Humidity is the main cause of paper jams. When a ream of paper is opened and the paper is left out exposed to the temperature in the building, this can cause the paper to ripple and curl which can then cause paper jams. Once a ream of paper is opened, the entire amount should be placed in the cassette trays. If the trays are full then place the remaining amount of paper in the storage bins at the bottom of the copier. The paper should be laid flat and on an even surface so that it doesn’t curl or bend.

Copy to save time. Instead of printing a large job, it is quicker to print one copy then use the copy function to complete the rest of the job.

If after following these tips you still encounter a problem, please open a help desk ticket with as much detailed information as possible and the equipment ID. The Equipment ID is located on a gold sticker on the front of the machine. This is needed if we have to submit a ticket to One Source.  

Kyocera Copier FAQs

The Kyocera copiers are all setup with PaperCut which simplifies copying, scanning and printing. PaperCut also has the ability to print securely, which prevents jobs from being printed unless you are right in front of the copier. Here are instructions for the most common features:

How to Copy

  1. Swipe your One Card with the magnetic stripe facing up.
  2. Click the Device Functions button on the screen.
  3. Select the copy options needed then click the green Start button.

How to Scan to Your Email

  1. Swipe your One Card with the magnetic stripe facing up.
  2. Click the Scan button on the screen.
  3. Click the Scan to My Email button.
  4. Change the Subject and Filename by clicking in the fields to bring up the keyboard. You can also click the Settings button to change how you want to scan the file.
  5. When done, click the Start button on the screen.

The copier will let you know when the scan is complete. The scanned file will appear as an attachment in an email in your inbox. Make any further changes or forward to someone else.

How to Scan to USB

  1. Swipe Your One Card with the magnetic stripe facing up.
  2. Insert your USB thumb drive (stick) in the USB slot on the side of the copier.
  3. Click the Device functions button on the screen.
  4. Click the Home button located right below the touchscreen.
  5. Click the Removable Memory button on the touchscreen.
  6. Click the Store File button on the lower right side of the touchscreen.
  7. Place the files you want to scan on the glass or document feeder.
  8. Click the green Start menu button to begin scanning.
  9. Then click the Finish Scan button on the touchscreen when done.

How to Use Secure Print

Secure print allows you to store jobs in a virtual queue for up to 2 hours. You can then release the job from specific copiers in your area. The job will only be released to the person who submitted the job. Therefore, you must login with your Goucher credentials or use your One Card.

  1. Send the document to the printer using either Secure_Print_BW (For Staff), Faculty_Print (For Faculty) or Goucher_Print (For Students). Color options are also available.
  2. Go up to the copier in your area and swipe your One Card with magnetic stripe facing up.
  3. Click the Release All button.

How to Enable Stapling Features on Macs

Since the secure print drivers were pushed out automatically, the options to enable stapling could not be pre-configured. However, you can still enable this feature by following these steps:

  1. Open System Preferences from the Apple menu (or Dock).
  2. Click the Printers & Scanners icon.
  3. Select the secure print driver (i.e., Goucher_Faculty, Secure_Print_BW) from the Printers list.
  4. Click the Options & Supplies… button to the right of the printer icon.
  5. Click the Options tab.
  6. Select Side Feeder from the Paper Feeders drop down list.
  7. Select 4000-sheet finisher from the Document Finisher drop down list.
  8. Then click OK.

You should then be able to access the staple options the next time you print. Follow these steps again for any other secure print drivers you have installed on your Mac.

How to Find Help with Other Features

  1. Swipe your One Card with the magnetic stripe facing up.
  2. Click the Device functions button on the screen.
  3. Click the Home button below the screen.
  4. Click the yellow Help button with the question mark on the screen.

Canvas

Instructors

Students

Get Help

The Canvas Support Team is ready to help you. They are available 24/7 (holidays too). Click the Help icon in the Canvas navigation panel to access an online trouble form, live chat, or phone number. You can also send an email to support@instructure.com.


Fuze Phone System

Goucher College uses a Fuze phone system for campus users.

Frequently Asked Questions:

Note: The term “soft key” in the following instructions refers to options available on the phone’s LCD panel.

I am the target text. 

Is there a Reference Guide available on telephone functions?

A Quick Reference Guide is available at Yealink-T41PT42G-QRG

I am the target text. 

How do I setup my voicemail ? (new users)

1. Press message key; or dial *123 to access Message Center
2. Enter initial password, which by default is your 4 digit extension
3. Record name and unavailable message (*busy message is not supported)
4. Change password/pin
a. Cannot be the same extension
b. Enter 4-15 non-sequential and non-recurring digits

I am the target text.
How do I change my voice mail pin?

This option is available from the voicemail menu options.
1. Log into your voicemail
2. Select the correct menu by pressing 0 (zero) and then 5
3. Follow the prompts to change your pin/password

If you forgot your pin, you can sign-in to the Fuze Portal from your web browser, select the “Voicemail Settings” tab, and click the Change PIN button. (Logging into the Fuze Portal is one of our FAQs on this page.

I am the target text. 

How do I transfer a call?

1. Press transfer (Tran) soft key
2. Enter number to transfer call to
3. Press transfer (Tran) soft key
4. You have the option of speaking with the party, or transferring after hearing ring-back tone

I am the target text. 

How do I start a conference call? 


1. While on an active call, press the Conference soft key
2. Enter the number of the second party
3. Press OK key
4. Press #SEND key
5. Press the Conference soft key when second party answers

I am the target text. 

How do I access my voice mail?

From on-campus – Click the message button key on your phone set and follow the prompts.

From my email  – By default, voicemails are sent to your email as an attachment. Open the attachment and play the recording to listen to the message left by callers. Note: You can turn this setting off via the Fuze portal website.

From off campus – 

1. Dial your office number (410-337-####) and wait for your greeting to start
2. Hit the *-key on your phone
3. Enter your PIN and follow the remaining prompts

I am the target text. 

How do I turn on and turn off Do Not Disturb (DND)/forward all calls to voicemail?

Press Do Not Disturb (DND) soft key to enable. The text “DND” will appear on the LCD screen when enabled.
Press DND soft key again to disable

I am the target text. 

What do I do when my phone says “Service Unavailable” or “Initializing”?

Unplug your phone cable from the back of the phone set and plug it in again to reset the phone.

I am the target text. 

What is the Fuze portal and how do I access it?

The Fuze portal is a web site that allows users to manage their phone and voicemail options from their browser. The portal is available at http://phones.goucher.edu?​ Note: Usernames vary and will either be entered as your Goucher username followed by @goucher.edu (such as jadoe001@goucher.edu) or your email address containing your full first and last name (such as Jane.Doe@goucher.edu). Users set their own password.

I am the target text.

How do I change my Fuze portal password?

Go to http://portal.thinkingphones.com/jetspeed/portal/forgot- password.psml and enter your username as your Goucher email (username@goucher.edu), and then follow the prompt to set up and email your password.

More resources:

Further details are available from the Fuze User Guide: Fuze User Guide

Fuze training videos are listed below:

Device and Screen Layout 4:27 https://vimeo.com/181848325/159330efab
Placing, Receiving, and Managing Calls 2:59 https://vimeo.com/181848326/5b1feb9ce9
Transferring Calls 1:30 https://vimeo.com/181848327/cc81e06afa
Conference Calls 2:27 https://vimeo.com/181848328/d1840194b7
Setting Up and Accessing Voicemail 1:47 https://vimeo.com/181848323/4c82d23bc5
Searching and Editing Within the Contact Directory 2:10 https://vimeo.com/181848324/f7349bf9b0

Using Box.com

What is Box.com?Snip20160606_14

Goucher provides Box.Com accounts for all current faculty and staff for storing computer files and folders. Files stored in a Box account can be accessed from multiple locations (home, office, etc.), from multiple devices (computer, phone, tablet), and are safe when unexpected technical problems arise (breakage, loss, theft, etc.)

Table of Contents

Upload Existing Content
Use Automatic Sync
Turn Syncing On and Off
Edit File Contents
Share a Link (Others can view only)
Collaborate (Others can edit)
Versions
Download the App
Real Time Co-Authoring

Uploading Existing Content

  1. Open a browser and go to http//goucher.box.com. (Chrome browser works best.)
  2. Login with your regular username and password
  3. Open File/Folder* View
  4. Drag and Drop onto BOX

*NOTE: You can only drag and drop folders onto BOX when using Chrome.


An alternate way to upload files is:

  1. Go to the folder you would like to upload to.
  2. Click “Upload” in the upper left to upload a file to the folder you are currently in.
  3. Select “Files” to upload a relatively small number of files.
  4. Select “Folders” to upload one or more folders, or a large number of files.

return to top

Use Automatic Sync

    1. After logging into your Goucher Box account, click on your name.
    2. Click “Get Box Sync”.
    3. Download and install the program.
    4. You will prompted to set up the connection with your Goucher Box.com account and enter your email and password. Enter your email as firstname.lastname@goucher.edu.
    5. Once the installation is complete and the connection made, a folder called “Box Sync” will appear with your other file locations so you can use Box as a regular drive. Anything saved or changed in this folder on your computer will automatically be uploaded to your Goucher Box account.


  1. *NOTE: This will create a copy of every synced file on the device’s hard drive. For this reason, it is not recommended that Box Sync be installed on home or public computers.

    return to top

    Turn Syncing On and Off

    If you have installed BoxSync on your computer, any files stored in this folder will automatically be synced with your Goucher Box account, but you can turn syncing off at any time if you want to save space on your hard drive but still keep a copy in your Box account.

    To do this:

    1.  Log into http://goucher.box.com and find the file you want edit.
    2. Right click on the folder/file or click on the “…” icon next to the folder/file.
    3. Hover over Properties in the drop down and select  “UnSync”.Or alternatively choose “Sync to Computer” to turn on syncing.

    *NOTE: Unsyncing a folder or file will remove it from the Box Sync folder on your computer. Deleting a file or folder in the Box Sync folder on your computer will delete in Box. If you need to recover a deleted file or folder, see here.

    Want to know more about Box Sync? Check here and here.

    return to top

    Editing File Contents

    Option 1: Edit Inside Browser

    Some files (Word, Excel, PowerPoint) can be edited in the browser.

    1. Go to BOX
    2. Select File to be edited
    3. Choose “Open With…” and select online option
    4. Edit
    5. All changes will be saved directly onto BOX

    *NOTE: If a file cannot be edited in the browser use Box Edit (see below). Alternatively, files that cannot be edited in the browser can be downloaded, edited, and then re-uploaded as a new version on Box.


    Option 2 – Use Box Edit

    Box Edit is a downloadable add-on that makes it easier to edit documents that you cannot edit inside your browser.

    You can download Box Edit here.

    For more information on Box Edit, check here.

    return to top

    Share a Link

    *VIEW-ONLY ACCESS*

    1. Click on the “Share” icon on top of the file/folder
    2. Share via email, or copy and paste the link

    return to top

    Collaborate

    *INCLUDES PERMISSION TO EDIT*

    1. Click on a folder.
    2.  Collaborators will listed in a panel on the right side of the screen.
    3. Click “Invite” to add new collaborators.

    Note: Collaborators invited without @goucher.edu email address (including students) will have to sign up for their own Box.com account.

    return to top

    Versions

    • When you edit a file in the browser or upload a new version of the file, Box overwrites the old version with this new version. You do not need to rename files as “Document Title_version2”.
    • Box keeps the old versions of your files, which means you can always access them. All of the old versions are saved in the version history.

    To upload a new version of a file click the “…” to the right of the file and select “Upload New Version”.

    newversionbox

    uploadnewversionbox

    Viewing Version History

    • The version history of a file can be viewed by clicking the “v” below the file name or when previewing a file.
      versionbox
    • When you look at the version history of a file, the current version is at the top. You can also “Download” or “Remove” (X) any versions. It is also possible to revert back to a previous version of a file by clicking on “Make Current”.

    return to top

    Download the App

    Users wishing to access their Box files on a mobile device such as a phone or tablet should download the Box.com app. An app is available for Android, Apple, and Windows10 devices. The app can be found from the mobile store you use to add any new apps to your device.

    return to top

    Real Time Co-Authoring

    With Box for Office Online, you can edit a document with other users in real time. All changes or edits will be automatically saved to Box. When collaborating on a document, the names of the users will appear in the upper right corner. Each collaborator’s text cursor will appear in a different color and their name will appear next to it.

    return to top