Tag Archives: print

Common Printing Problems with Macs (Faculty/Staff)

There are two main errors that occur when sending print jobs on a Mac on campus:

  • You get a “Hold for Authentication” error
  • The printer pauses itself (even after you trying resuming it multiple times)

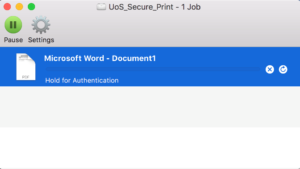
Hold for Authentication

This error (shown above) occurs when the password your computer has saved doesn’t match what your current Goucher password is in the system. This usually happens after changing your Goucher account password. This is how to fix it:

  • Open the printer queue window. If you just tried to send the print job, it is likely showing a printer icon on your Dock with a warning symbol on it, which will take you to the queue window.
    • If you do not see a printer icon on the Dock, You can also click on the magnifying glass in the top right corner and search for “Printers & Scanners”. The Printers window will appear; double-click the printer on the left-side panel that is throwing the error.
  • Next to the print job that’s being held, there are two buttons. One has an X on it, and the other is a circular arrow. Click the circular arrow button.
  • A window will pop up asking for your credentials. Make sure your username is in the username field, and re-type in your new Goucher password in the password field.
    • Remember to click the check box to save it to your keychain.
  • Click OK.

The print job should now properly send. You may have to repeat this for all of the remaining jobs that are being held (or you can cancel them and re-print).

Printer Repeatedly Pausing (Even After Resuming)

This primarily occurs because your computer is connected to GoucherGuest and not GoucherWIFI. Click on the WiFi icon in the top right corner on your screen, and switch your computer to GoucherWIFI.
If the computer still keeps connecting to GoucherGuest, you may need to remove GoucherGuest from your saved networks list. This article details the steps on how to do that: How to remove a saved WiFi network in Mac OS X

If neither of those two fixes resolve the issue, please contact the Help Desk.
Tips to Help Minimize Printing Problems

Copiers will jam from time to time for a variety of reasons. However, there are ways that we can minimize this and other problems. Here are some tips provided by our vendor, One Source:

Gently close the cassette trays. The trays are designed to close on their own with a slight push. If you push the trays too hard, the internal mechanisms can break causing the copier to not recognize that there’s paper in that tray or worse. This can then cause it to want to bypass the tray and use the multipurpose tray.

Make sure that the correct paper type in the printer driver is selected. If you are printing on regular 8.5 x 11 size paper, the default paper size should be set to “Letter” and paper type (also called “media” type) set to “Unspecified” or “Plain.” Only if you are printing on special paper should you change these options. This will allow the copier to adjust the temperature and default to using the appropriate cassette tray.

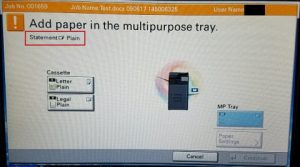
If you are not using special paper and are still prompted to use the multipurpose tray, check the screen to see which paper type it is detecting from your printer drivers. As you can see in the screenshot below it is detecting “Statement” as the paper type and therefore wants to default to the multipurpose tray.
If this happens, select the tray that you want to use on the screen then make sure to change the options in your printer drivers so this will not happen again.

Place paper in the cassette tray or storage bin. Humidity is the main cause of paper jams. When a ream of paper is opened and the paper is left out exposed to the temperature in the building, this can cause the paper to ripple and curl which can then cause paper jams. Once a ream of paper is opened, the entire amount should be placed in the cassette trays. If the trays are full then place the remaining amount of paper in the storage bins at the bottom of the copier. The paper should be laid flat and on an even surface so that it doesn’t curl or bend.

Copy to save time. Instead of printing a large job, it is quicker to print one copy then use the copy function to complete the rest of the job.

If after following these tips you still encounter a problem, please open a help desk ticket with as much detailed information as possible and the equipment ID. The Equipment ID is located on a gold sticker on the front of the machine. This is needed if we have to submit a ticket to One Source.  

Mobility Print

Mobility Print gives students the ability to print from any device.

How to Setup Mobility Print on your Device:

https://www.papercut.com/support/resources/manuals/mobility-print/mobility-print-devices/topics/en/client-setup.html

Windows Users: You must go to http://printserv:9163/setup in order to download and install the Mobility Print application.

How to Print:

  1. Connect to GoucherWIFI. Otherwise, you will not be able to print.
  2. If printing from a phone or tablet, make sure that printing is enabled.
  3. Open the file that you would like to print. If it has a print or share to print option then you should be able to print the file from your device.
  4. Once you click the print button, the mobility print option will appear. Make sure to change the paper size to “Letter” if that’s not already selected.
  5. Then click the Print button/link.

A message will appear on your device once the job is successfully sent from Mobility Print. You can then pick up your job at the printer.

Video Tutorials:

Using Mobility Print on MacOS

Using Mobility Print on Android

Need Help?

Connect to GoucherWIFI
Experiencing a problem? Make sure that you’re connected to GoucherWIFI first.

Unable to Select Printer
If you’re not able to see a list of printers or click on a printer and nothing happens, restart either the app that you want to print from and/or the device.

If you still experience a problem, contact the Help Desk for assistance.

Kyocera Copier FAQs

The Kyocera copiers are all setup with PaperCut which simplifies copying, scanning and printing. PaperCut also has the ability to print securely, which prevents jobs from being printed unless you are right in front of the copier. Here are instructions for the most common features:

How to Copy

  1. Swipe your One Card with the magnetic stripe facing up.
  2. Click the Device Functions button on the screen.
  3. Select the copy options needed then click the green Start button.

How to Scan to Your Email

  1. Swipe your One Card with the magnetic stripe facing up.
  2. Click the Scan button on the screen.
  3. Click the Scan to My Email button.
  4. Change the Subject and Filename by clicking in the fields to bring up the keyboard. You can also click the Settings button to change how you want to scan the file.
  5. When done, click the Start button on the screen.

The copier will let you know when the scan is complete. The scanned file will appear as an attachment in an email in your inbox. Make any further changes or forward to someone else.

How to Scan to USB

  1. Swipe Your One Card with the magnetic stripe facing up.
  2. Insert your USB thumb drive (stick) in the USB slot on the side of the copier.
  3. Click the Device functions button on the screen.
  4. Click the Home button located right below the touchscreen.
  5. Click the Removable Memory button on the touchscreen.
  6. Click the Store File button on the lower right side of the touchscreen.
  7. Place the files you want to scan on the glass or document feeder.
  8. Click the green Start menu button to begin scanning.
  9. Then click the Finish Scan button on the touchscreen when done.

How to Use Secure Print

Secure print allows you to store jobs in a virtual queue for up to 2 hours. You can then release the job from specific copiers in your area. The job will only be released to the person who submitted the job. Therefore, you must login with your Goucher credentials or use your One Card.

  1. Send the document to the printer using either Secure_Print_BW (For Staff), Faculty_Print (For Faculty) or Goucher_Print (For Students). Color options are also available.
  2. Go up to the copier in your area and swipe your One Card with magnetic stripe facing up.
  3. Click the Release All button.

How to Enable Stapling Features on Macs

Since the secure print drivers were pushed out automatically, the options to enable stapling could not be pre-configured. However, you can still enable this feature by following these steps:

  1. Open System Preferences from the Apple menu (or Dock).
  2. Click the Printers & Scanners icon.
  3. Select the secure print driver (i.e., Goucher_Faculty, Secure_Print_BW) from the Printers list.
  4. Click the Options & Supplies… button to the right of the printer icon.
  5. Click the Options tab.
  6. Select Side Feeder from the Paper Feeders drop down list.
  7. Select 4000-sheet finisher from the Document Finisher drop down list.
  8. Then click OK.

You should then be able to access the staple options the next time you print. Follow these steps again for any other secure print drivers you have installed on your Mac.

How to Find Help with Other Features

  1. Swipe your One Card with the magnetic stripe facing up.
  2. Click the Device functions button on the screen.
  3. Click the Home button below the screen.
  4. Click the yellow Help button with the question mark on the screen.